一:微服务架构
1.0:单体架构
将项目所有模块(功能)打成jar或者war,然后部署一个进程
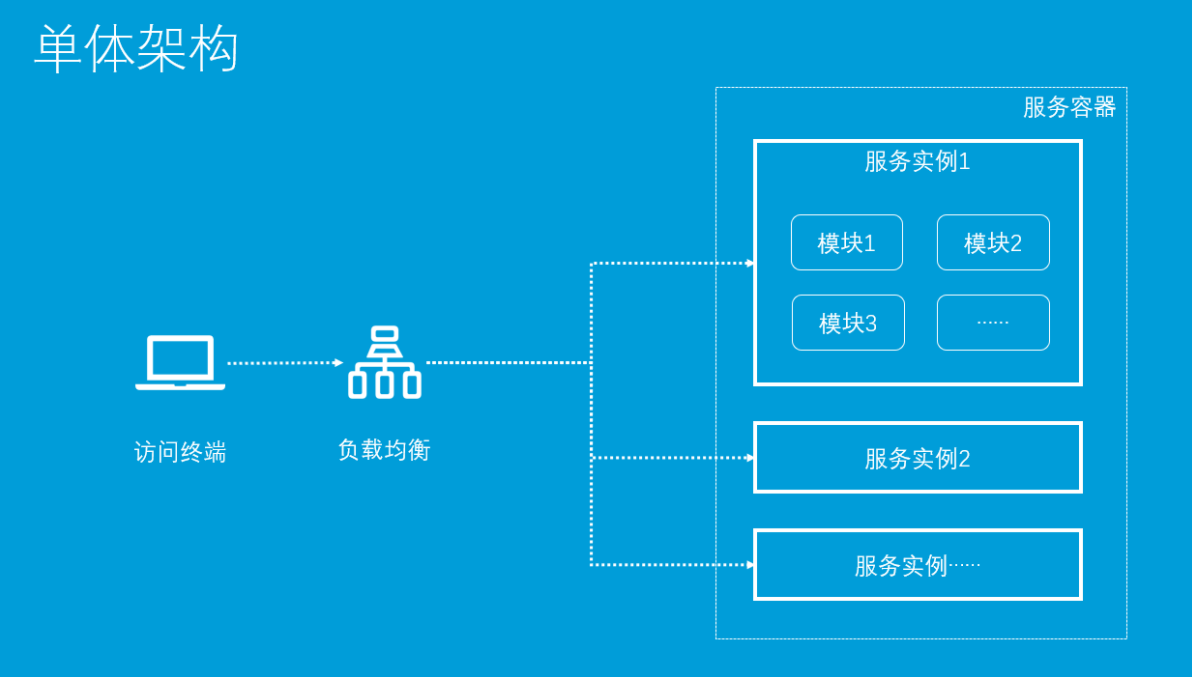
优点:
1:部署简单: 由于是完整的结构体,可以直接部署在一个服务器上即可。
2:技术单一: 项目不需要复杂的技术栈,往往一套熟悉的技术栈就可以完成开发。
3:用人成本低: 单个程序员可以完成业务接口到数据库的整个流程。

缺点:
1:系统启动慢, 一个进程包含了所有的业务逻辑,涉及到的启动模块过多,导致系统的启动、重启时间周期过长;
2:系统错误隔离性差、可用性差,任何一个模块的错误均可能造成整个系统的宕机;
3:可伸缩性差:系统的扩容只能只对这个应用进行扩容,无法结合业务模块的特点进行伸缩。
4:线上问题修复周期长:任何一个线上问题修复需要对整个应用系统进行全面升级。
5. 跨语言程度差
6. 不利于安全管理,所有开发人员都拥有全量代码1.1:微服务架构
微服务架构论文:https://martinfowler.com/articles/microservices.html
In short, the microservice architectural style [1] is an approach to developing a single application as a suite of small services, each running in its own process and communicating with lightweight mechanisms( 美 ['mekə,nɪzəm]  机制), often an HTTP resource API. These services are built around business capabilities and independently deployable by fully automated deployment machinery. There is a bare minimum of centralized management of these services, which may be written in different programming languages and use different data storage technologies.

简而言之,微服务架构风格[1]这种开发方法,是以开发一组小型服务的方式来开发一个独立的应用系统的。其中每个小型服务都运行在自己的进程中,并经常采用HTTP资源API这样轻量的机制来相互通信。这些服务围绕业务功能进行构建,并能通过全自动的部署机制来进行独立部署。这些微服务可以使用不同的语言来编写,并且可以使用不同的数据存储技术。对这些微服务我们仅做最低限度的集中管理。解读微服务特点:
1:微服务是一种项目架构思想(风格)
2:微服务架构是一系列小服务的组合(组件化与多服务)
3:任何一个微服务,都是一个独立的进程(独立开发、独立维护、独立部署)
4:轻量级通信http协议(跨语言,跨平台)
5:服务粒度(围绕业务功能拆分)
6:去中心化管理(去中心化”地治理技术、去中心化地管理数据)
1.2:微服务架构的优势
1.易于开发和维护 一个微服务只关注一个特定的业务功能,所以它的业务清晰、代码量较少。开发和维护单个微服务相对比较简单,整个应用是由若干个微服务构建而成,所以整个应用也会维持在可控状态;
2.单个微服务启动较快 单个微服务代码量较少,所以启动会比较快;
3.局部修改容易部署 单体应用只要有修改,就要重新部署整个应用,微服务解决了这样的问题。一般来说,对某个微服务进行修改,只需要重新部署这个服务即可;
4.技术栈不受限 在微服务中,我们可以结合项目业务及团队的特点,合理地选择技术栈
5.按需伸缩
1.3:微服务架构的缺点(挑战)
1、服务太多,导致服务间的依赖错综复杂,运维难度大
2、微服务放大了分布式架构的系列问题
- 分布式事务(seata)、
- 分布式锁怎么处理(redisson),
- 服务注册与发现(nacos)、
- 依赖服务不稳定(sentinel)导致服务雪崩怎么办?
3、运维复杂度陡增,部署数量多、监控进程多导致整体运维复杂度提升。
1.4:SpringCloud与微服务关系
Springcloud为微服务思想提供了完美的解决方案
Springcloud是一些列框架的集合体(服务的注册与发现【注册中心】、服务间远程调用、服务降级、服务熔断、服务限流、分布式事务 等)
txt一般我们说springcloud 其实指的是Springcloud-netflix,Springcloud并不是造轮子,只是把Netflix公司的组件做二次开发
1.5:SpringBoot和SpringCloud关系
SpringBoot专注于快速方便的开发单个个体微服务。
SpringCloud是关注全局的微服务协调、整理、治理的框架,它将SpringBoot开发的单体整合并管理起来。
SpringBoot可以离开SpringCloud独立使用开发项目,但是SpringCloud离不开SpringBoot,属于依赖关系。
二:服务注册与发现
2.1:服务注册与发现
服务注册,就是将提供某个服务的模块信息(通常是这个服务的ip和端口)注册到1个公共的组件上去(比如: zookeeper\consul\eureka\nacos)。
服务发现,就是新注册的这个服务模块能够及时的被其他调用者发现。不管是服务新增和服务删减都能实现自动发现。
2.2:注册中心对比
nacos:是阿里开源的,经过了阿里实践的
eureka:netflix公司的,现在不维护了,不开源了
Consul : HashiCorp 公司推出的开源产品,用于实现分布式系统的服务发现、服务隔离、服务配置
| 对比组件 | Nacos | Eureka | Consul | Zookeeper |
|---|---|---|---|---|
| 一致性对比 | 支持AP和CP模型 | AP模型 | CP模型 | CP模型 |
| 健康检查 | tcp/http/client Beat | client Beat | TCP/HTTP/gRPC | keep Alive |
| 负载均衡策略 | Ribbon | Ribbon | Fabio | - |
| 雪崩保护 | 有 | 有 | 无 | 无 |
| 自动注销实例 | 支持 | 支持 | 不支持 | 支持 |
| 访问协议 | HTTP | HTTP | HTTP | TCP |
| 监听支持 | 支持 | 支持 | 支持 | 支持 |
| 多数据中心 | 支持 | 支持 | 支持 | 不支持 |
| 跨注册中心同步 | 支持 | 不支持 | 支持 | 不支持 |
| Springcloud集成 | 支持 | 支持 | 支持 | 不支持 |
| Dubbo集成 | 支持 | 不支持 | 不支持 | 支持 |
| K8s集成 | 支持 | 不支持 | 支持 | 不支持 |
三:nacos简介与安装
官网:https://nacos.io/zh-cn/docs/what-is-nacos.html
3.1:nacos功能与架构
nacos架构:

nacos功能:
名字服务 (Naming Service)
txt命名服务是指通过指定的名字来获取资源或者服务的地址,提供者的信息
配置服务 (Configuration Service)
txt动态配置服务让您能够以中心化、外部化和动态化的方式管理所有环境的配置。动态配置消除了配置变更时重新部署应用和服务的需要。配置中心化管理让实现无状态服务更简单,也让按需弹性扩展服务更容易。
3.2:nacos安装
下载地址:https://github.com/alibaba/nacos/tags
1:解压安装
2:配置
3:创建数据库以及表(conf>nacos-mysql.sql)
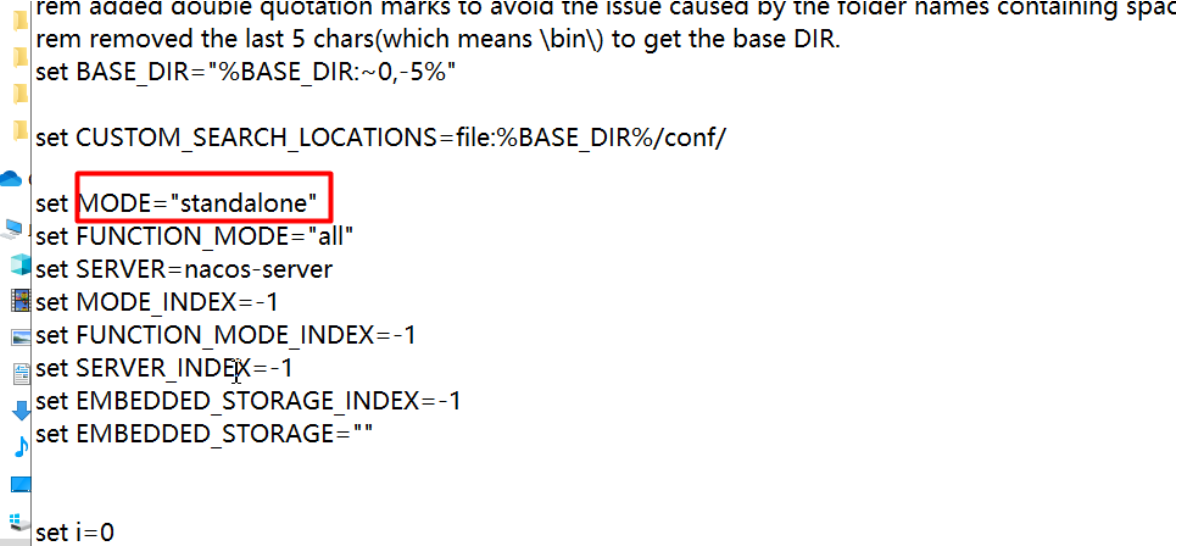
4:配置startup.cmd,以standalone方式启动
5:启动
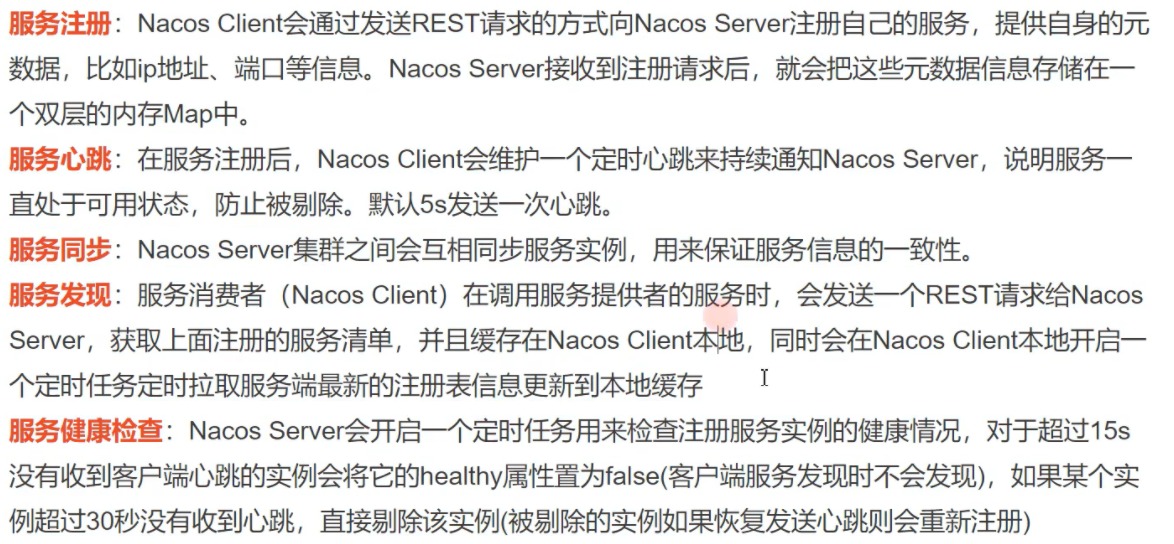
3.3:nacos注册中心工作流程
四:微服务入门案例
4.1:boot与cloud版本
springboot:提供了快速开发微服务的能力
springcloud提供了微服务治理的能力(服务注册与发现、服务降级、限流、熔断、网关、负载均衡、配置中心...),为微服务开发提供了全家桶服务springboot的版本查看地址:https://spring.io/projects/spring-boot#learn
springcloud的版本查看地址:https://spring.io/projects/spring-cloud#overview
详细版本对应信息查看:https://start.spring.io/actuator/info

注意:
如果采用springboot和springcloud(springcloud netflix)那么使用以上版本对应就ok了,
但是如果要使用alibaba的组件(nacos、sentinel、RocketMQ、Seata)必须使用springcloud alibaba4.2:SpringCloud-alibaba
Springcloud与springcloud-alibaba关系
◆ 我们通常说的SpringCloud,泛指Spring Cloud Netflix,也是springcloud第一代
◆ SpringCloud Alibaba是SpringCloud的子项目,是阿里巴巴结合自身微服务实践,
◆ SpringCloud Alibaba符合SpringCloud标准,依赖于springcloud
4.3:确定版本
确定方式:通过查看springcloud alibaba 官网确定
https://github.com/alibaba/spring-cloud-alibaba/wiki/版本说明
| Spring Cloud Version | Spring Cloud Alibaba Version | Spring Boot Version |
|---|---|---|
| Spring Cloud Hoxton.SR8 | 2.2.4.RELEASE | 2.3.2.RELEASE |
| Spring Cloud Greenwich.SR6 | 2.1.3.RELEASE | 2.1.13.RELEASE |
| Spring Cloud Hoxton.SR3 | 2.2.1.RELEASE | 2.2.5.RELEASE |
| Spring Cloud Hoxton.RELEASE | 2.2.0.RELEASE | 2.2.X.RELEASE |
| Spring Cloud Greenwich | 2.1.2.RELEASE | 2.1.X.RELEASE |
| Spring Cloud Finchley | 2.0.3.RELEASE | 2.0.X.RELEASE |
| Spring Cloud Edgware | 1.5.1.RELEASE(停止维护,建议升级) | 1.5.X.RELEASE |
最终决定(版本号记忆):
springcloud-alibaba: 2.2.5.RELEASE
springcloud: Hoxton.SR8
springboot: 2.3.2.RELEASE
4.4:创建父工程
父工程锁定springboot、springcloud、springcloud-alibaba版本
<parent>
    <groupId>org.springframework.boot</groupId>
    <artifactId>spring-boot-starter-parent</artifactId>
    <version>2.3.2.RELEASE</version>
    <relativePath/> <!-- lookup parent from repository -->
</parent>

<properties>
    <project.build.sourceEncoding>UTF-8</project.build.sourceEncoding>
    <project.reporting.outputEncoding>UTF-8</project.reporting.outputEncoding>
    <java.version>1.8</java.version>
</properties>

<dependencyManagement>
    <dependencies>
        <dependency>
            <groupId>com.alibaba.cloud</groupId>
            <artifactId>spring-cloud-alibaba-dependencies</artifactId>
            <version>2.2.5.RELEASE</version>
            <type>pom</type>
            <scope>import</scope>
        </dependency>
        <dependency>
            <groupId>org.springframework.cloud</groupId>
            <artifactId>spring-cloud-dependencies</artifactId>
            <version>Hoxton.SR8</version>
            <type>pom</type>
            <scope>import</scope>
        </dependency>

    </dependencies>
</dependencyManagement>4.5:服务提供者 03-cloud-search
4.5.1:pom.xml
    <dependencies>
<!--    web的场景依赖    -->
        <dependency>
            <groupId>org.springframework.boot</groupId>
            <artifactId>spring-boot-starter-web</artifactId>
        </dependency>
<!--     端点监控的场景依赖   -->
        <dependency>
            <groupId>org.springframework.boot</groupId>
            <artifactId>spring-boot-starter-actuator</artifactId>
        </dependency>
<!--     nacos场景依赖   -->
        <dependency>
            <groupId>com.alibaba.cloud</groupId>
            <artifactId>spring-cloud-starter-alibaba-nacos-discovery</artifactId>
        </dependency>

</dependencies>4.5.2:application.yml
spring:
  application:
    name: cloud-search   #服务名称 唯一
  cloud:
    nacos:
      discovery:
        server-addr: localhost:8848
        namespace: java2110
server:
port: 90814.5.3:启动类加注解
package com.glls.search;

import org.springframework.boot.SpringApplication;
import org.springframework.boot.autoconfigure.SpringBootApplication;
import org.springframework.cloud.client.discovery.EnableDiscoveryClient;


@SpringBootApplication
@EnableDiscoveryClient
public class SearchApp {
    public static void main(String[] args) {

        SpringApplication.run(SearchApp.class,args);
    }
}补充内容: actuator 端点监控 或者 健康监控 sb 提供的一种 通过接口对外暴露信息的机制
management:
  endpoint:    # 单个端口的 启用  或者 关闭
    shutdown:    #  默认  没有启动
      enabled: true      # 启用端口
#    info:
#      enabled: false    # info 端口  默认就是启用
#    logfile:
#      enabled: true
#    heapdump:
#      enabled: true


  endpoints:
    #enabled-by-default: true    # 启用所有端口
    web:
      exposure:
        include: "*"    # 暴露所有端口     可以通过 下方的 请求  查看到 暴露的端口信息
exclude: info,health # 不暴露的 端口 排除这些端口通过访问 :http://localhost:9081/actuator 查看暴露的端口信息
当配置暴露所有web 端口
management:
  endpoints:
    web:
      exposure:
        include: "*"
4.5.4:查询商品接口
@RestController
@RequestMapping("/search")
public class SearchController {

    @RequestMapping("/test")
    public String testSearch(String name,@RequestHeader("Foo") String foo){
        System.out.println(name);
        System.out.println(foo+"!!!!");
        return "search";
    }
}4.5.5: 公共依赖模块 01-cloud-common
依赖
<?xml version="1.0" encoding="UTF-8"?>
<project xmlns="http://maven.apache.org/POM/4.0.0"
         xmlns:xsi="http://www.w3.org/2001/XMLSchema-instance"
         xsi:schemaLocation="http://maven.apache.org/POM/4.0.0 http://maven.apache.org/xsd/maven-4.0.0.xsd">
    <parent>
        <artifactId>cloud-parent</artifactId>
        <groupId>com.glls.java2110</groupId>
        <version>1.0-SNAPSHOT</version>
    </parent>
    <modelVersion>4.0.0</modelVersion>

    <artifactId>01-cloud-common</artifactId>

    <properties>
        <maven.compiler.source>8</maven.compiler.source>
        <maven.compiler.target>8</maven.compiler.target>
    </properties>
    <dependencies>
        <!-- 健康检查的场景依赖-->
        <dependency>
            <groupId>org.springframework.boot</groupId>
            <artifactId>spring-boot-starter-actuator</artifactId>
        </dependency>

        <dependency>
            <groupId>org.projectlombok</groupId>
            <artifactId>lombok</artifactId>
        </dependency>
    </dependencies>
</project>实体类
@Data
@AllArgsConstructor
@NoArgsConstructor
public class Goods {

    private Integer id;

    private String goodsName;

    private Double price;
}@Data
@AllArgsConstructor
@NoArgsConstructor
public class Order {
private Integer orderId;
private Integer userId;
private Date orderDate;
private Integer productId;
private Integer productNum;
}4.6:服务消费者 02-cloud-customer
4.6.1:pom.xml
<?xml version="1.0" encoding="UTF-8"?>
<project xmlns="http://maven.apache.org/POM/4.0.0"
         xmlns:xsi="http://www.w3.org/2001/XMLSchema-instance"
         xsi:schemaLocation="http://maven.apache.org/POM/4.0.0 http://maven.apache.org/xsd/maven-4.0.0.xsd">
    <parent>
        <artifactId>cloud-parent</artifactId>
        <groupId>com.glls.java2110</groupId>
        <version>1.0-SNAPSHOT</version>
    </parent>
    <modelVersion>4.0.0</modelVersion>

    <artifactId>02-cloud-customer</artifactId>

    <properties>
        <maven.compiler.source>8</maven.compiler.source>
        <maven.compiler.target>8</maven.compiler.target>
    </properties>

        <dependencies>
            <dependency>
                <groupId>com.glls.java2110</groupId>
                <artifactId>01-cloud-common</artifactId>
                <version>1.0-SNAPSHOT</version>
            </dependency>
            <!--  web的场景依赖      -->
            <dependency>
                <groupId>org.springframework.boot</groupId>
                <artifactId>spring-boot-starter-web</artifactId>
            </dependency>

            <!-- nacos服务注册与发现的场景依赖-->
            <dependency>
                <groupId>com.alibaba.cloud</groupId>
                <artifactId>spring-cloud-starter-alibaba-nacos-discovery</artifactId>
            </dependency>
        </dependencies>
</project>4.6.2:application.yml
spring:
  application:
    name: cloud-customer  #服务的应用名称
  cloud:
    nacos:
      discovery: #nacos配置
        server-addr: localhost:8848

server:
port: 80814.6.3:启动类加注解
package com.glls.customer;

import org.springframework.boot.SpringApplication;
import org.springframework.boot.autoconfigure.SpringBootApplication;
import org.springframework.cloud.client.loadbalancer.LoadBalanced;
import org.springframework.context.annotation.Bean;
import org.springframework.web.client.RestTemplate;

@SpringBootApplication
public class CustomerApp {
    public static void main(String[] args) {
        SpringApplication.run(CustomerApp.class,args);
    }

    @Bean
    //让ribbon拦截RestTemplate发出的所有的请求
    //ribbon获取url中的service name
    //从nacos注册中心获取实例列表
    //负责从实例列表中通过相应的负载均衡算法,获取一个实例
    //RestTemplate请求实例
    //@LoadBalanced      这个注解打开   就会依据 服务名 进行负载均衡
    public RestTemplate initRestTemplate(){
        return new RestTemplate();
    }
}4.6.4:保存订单接口
package com.glls.customer.controller;

import com.glls.common.entity.Goods;
import com.glls.customer.feign.SearchApi;
import org.springframework.beans.factory.annotation.Autowired;
import org.springframework.beans.factory.annotation.Value;
import org.springframework.cloud.context.config.annotation.RefreshScope;
import org.springframework.http.ResponseEntity;
import org.springframework.web.bind.annotation.RequestMapping;
import org.springframework.web.bind.annotation.RestController;
import org.springframework.web.client.RestTemplate;

import java.util.HashMap;
import java.util.Map;

/**
 * @ClassName : CustomerController
 * @Author : glls
 * @Date: 2021/12/20 10:28
 * @Description :
 */
@RestController
@RequestMapping("/customer")
public class CustomerController {

    @Autowired
    private RestTemplate restTemplate;


    @RequestMapping("/test")
    public String testCustomer(){
        //案例1
        //String url="http://localhost:9081/search/test?name={1}";    //硬编码 写死了  实际开发不这样做
        //ResponseEntity<String> forEntity = restTemplate.getForEntity(url, String.class,"zs");


        //案例2
        //String url="http://localhost:9081/search/test?name={name}";    //硬编码 写死了  实际开发不这样做
        //Map<String, String> map = new HashMap<>();
        //map.put("name", "李四");
        //ResponseEntity<String> forEntity = restTemplate.getForEntity(url, String.class,map);
        //
        //案例3
        //String url="http://localhost:9081/search/test2";    //硬编码 写死了  实际开发不这样做
        //Map<String, String> map = new HashMap<>();
        //map.put("name", "李四");
        ////参数1 请求地址
        ////参数2 携带的数据  会被转为json ,所以  被调用的接口 需要使用 @RequestBody注解
        ////参数3  被调用的接口的返回值类型
        //ResponseEntity<String> forEntity = restTemplate.postForEntity(url, new Goods("huawei", 99.9),String.class);


        //案例4
        String url="http://cloud-search/search/test2";    //硬编码 写死了  实际开发不这样做

        //参数1 请求地址
        //参数2 携带的数据  会被转为json ,所以  被调用的接口 需要使用 @RequestBody注解
        //参数3  被调用的接口的返回值类型
        ResponseEntity<String> forEntity = restTemplate.postForEntity(url, new Goods(1,"huawei", 99.9),String.class);


        return "customer:"+forEntity.getBody();
    }


}4.7:微服务集群演示
#如果不指定端口,那么微服务启动时使用9081,如果指定端口,那么微服务就在指定端口启动
-Dserver.port=9082
4.8:nacos领域模型
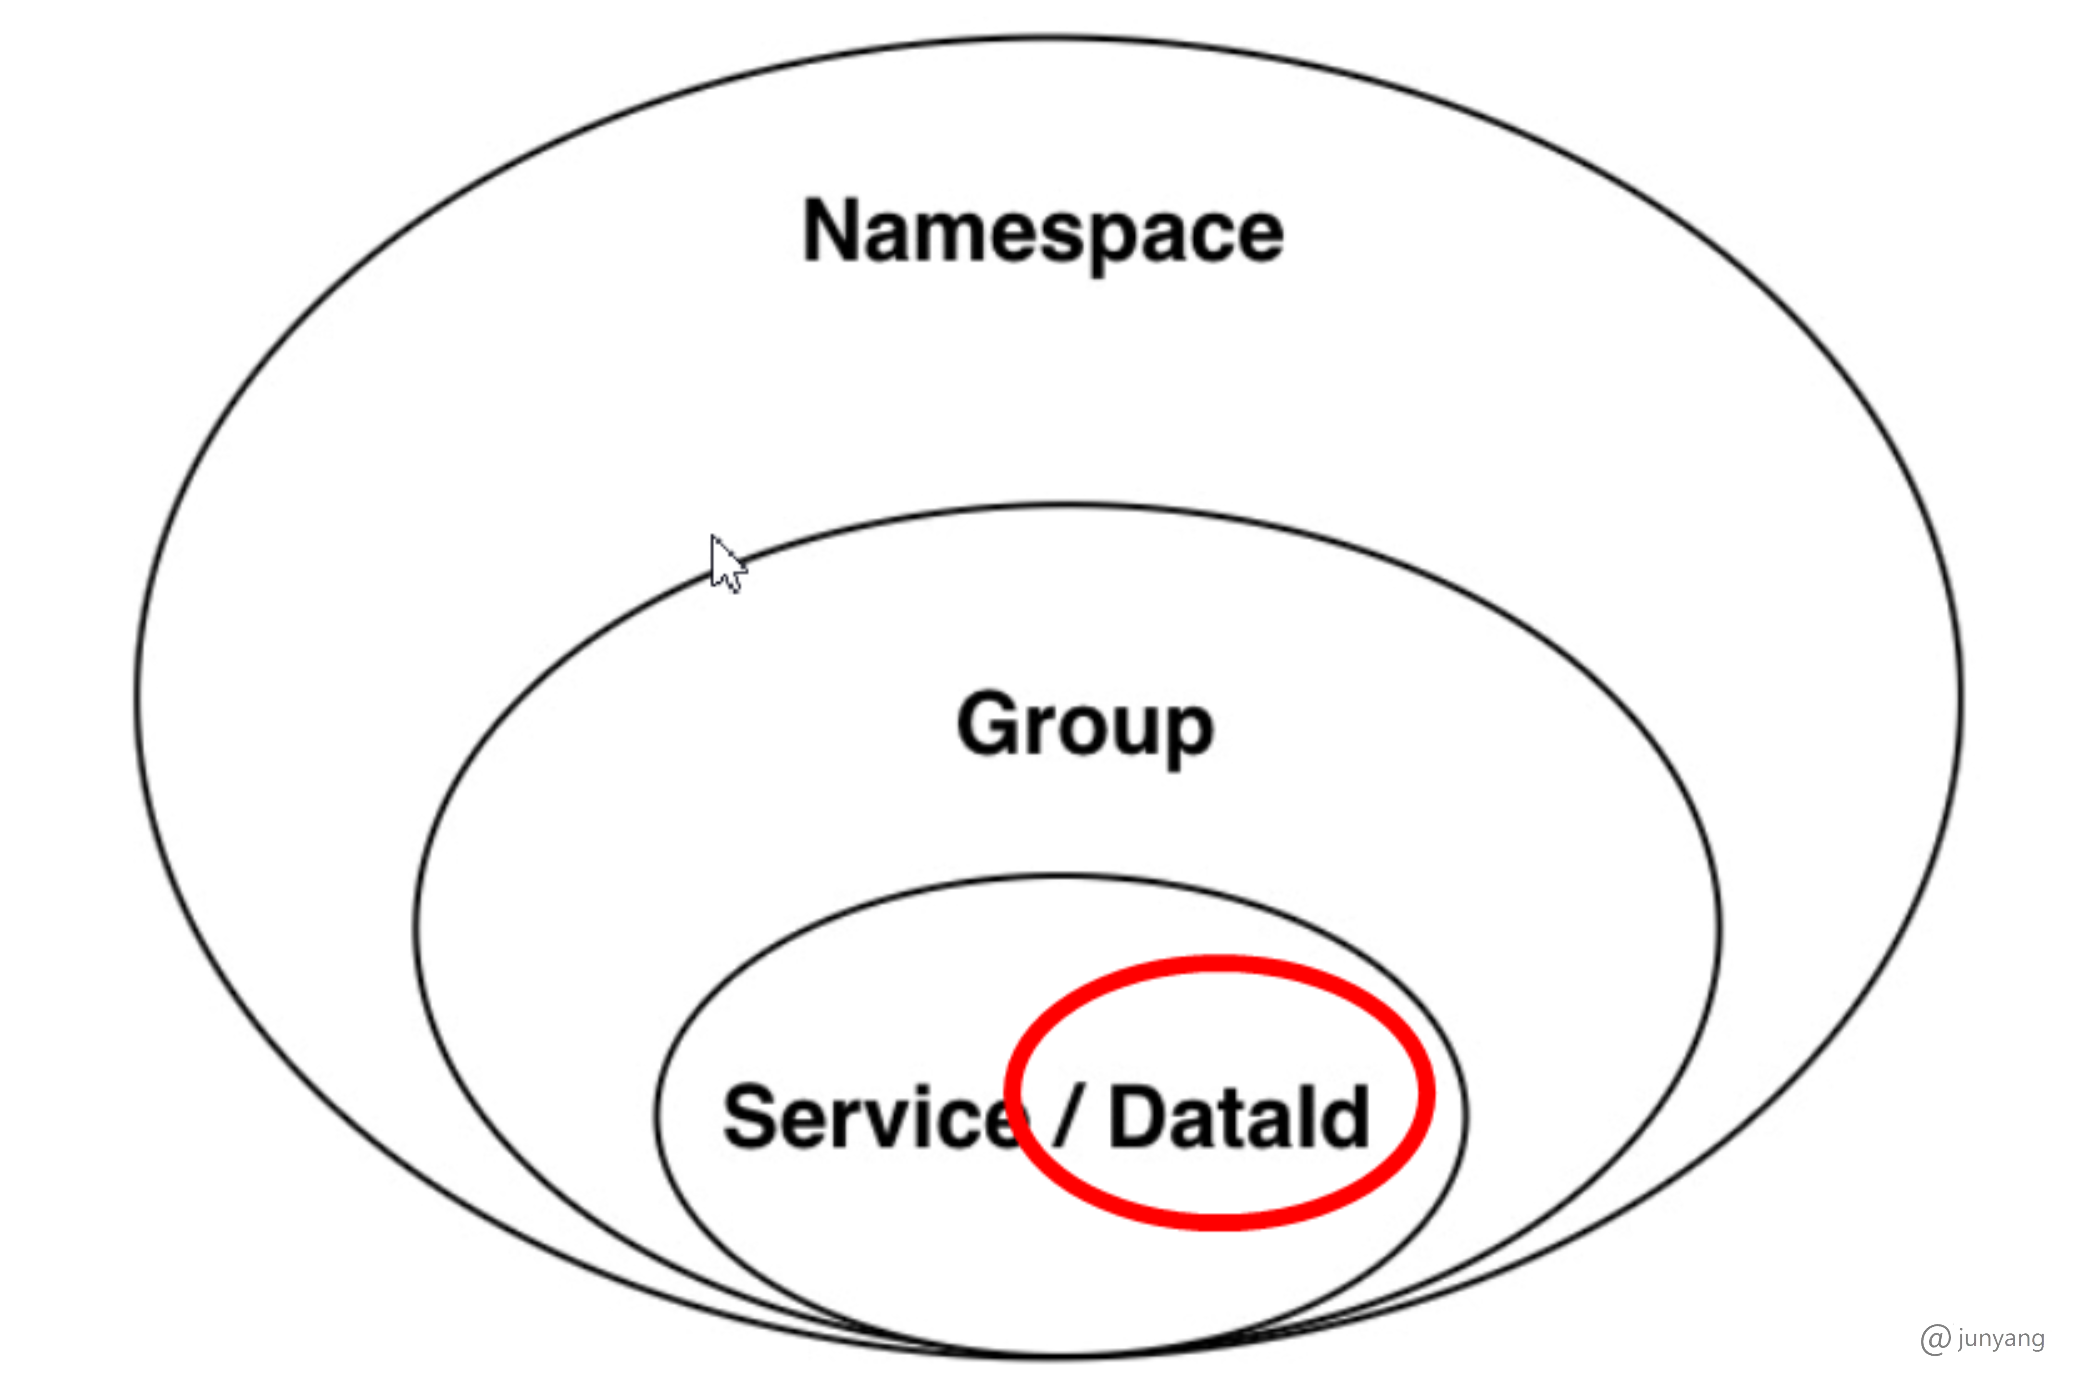
nacos的服务由三元组唯一确定   (namespace、group、servicename)
nacos的配置由三元组唯一确定     (namespace、group、dataId)

不同的namespace是相互隔离的,相同namespace但是不同的group也是相互隔离的

默认的namespace是public ,不能删除
默认的group是DEFAULT-GROUP1:创建namespace

2:发布服务到指定的namespace
五:RestTemplate
实现服务间远程调用
5.1:RestTemplate简介
1:RestTemplate是java模拟浏览器发送http请求的工具类
2:RestTemplate基于`Apache`的`HttpClient`实现。HttpClient使用起来太过繁琐。spring提供了一种简单便捷的模板类来进行操作,这就是`RestTemplate`。

Openfeign5.2:ForObject
返回的是响应结果
get请求
Map goods = restTemplate.getForObject(BaseURL+"findGoodsById?goodsId=12", Map.class);
System.out.println(goods.get("goodsName"));post请求(发送的是json串)
Map goods = restTemplate.postForObject(BaseURL + "/save", new Goods("huawei", 99.99), Map.class);
System.out.println(goods.get("code"));提示:
1:微服务之间数据传输格式统一为json
2:entity的空构造方法要提供
@Data
@AllArgsConstructor
@NoArgsConstructor
public class Goods  {

      private String goodsName;
      private double price;

}5.3:ForEntity
返回的是响应体
get请求
ResponseEntity<Goods> forEntity = restTemplate.getForEntity(BaseURL + "findGoodsById?goodsId=12", Goods.class);

System.out.println("http status:"+forEntity.getStatusCode());
System.out.println("http response body:"+forEntity.getBody());post请求
ResponseEntity<Map> responseEntity = restTemplate.postForEntity(BaseURL + "/save", new Goods("huawei", 99.99), Map.class);

System.out.println("http status:"+responseEntity.getStatusCode());
System.out.println("http response body:"+responseEntity.getBody());六:负载均衡器Ribbon
nacos:注册中心,解决服务的注册与发现
Ribbon:客户端的负载均衡器,解决的是服务实例列表的负载均衡的问题6.1:Ribbon简介
Ribbon是Netflix公司开源的一个负载均衡的项目,是一个"客户端"负载均衡器,运行在客户端上6.2:Ribbon在项目中怎么使用
第一步:pom依赖
springcloud alibaba 对Ribbon做了兼容

第二步:@LoadBalanced注解
@Bean
@LoadBalanced
public RestTemplate restTemplate(){

    return new RestTemplate();
}6.3:Ribbon的工作流程
结合restTemplate 实现负载均衡 ribbon 是通过一个 拦截器 对服务发出的请求 进行拦截 获取到请求路径上的服务名
根据服务名 去nacos 获取服务的实例列表,再根据 IRule 负载均衡策略 选择一个具体的服务进行访问
6.4:Ribbon源码追踪
LoadBalancerInterceptor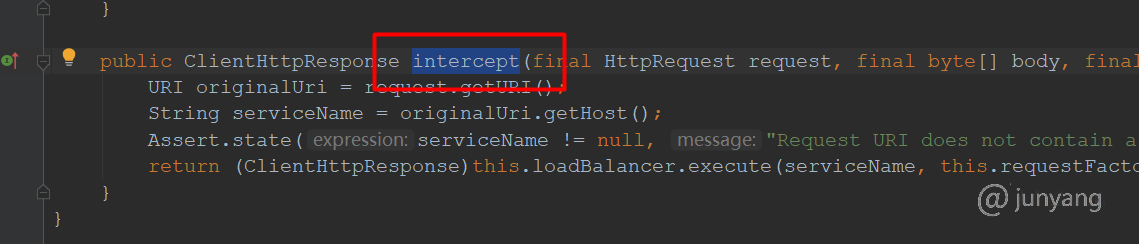
RibbonLoadBalancerClient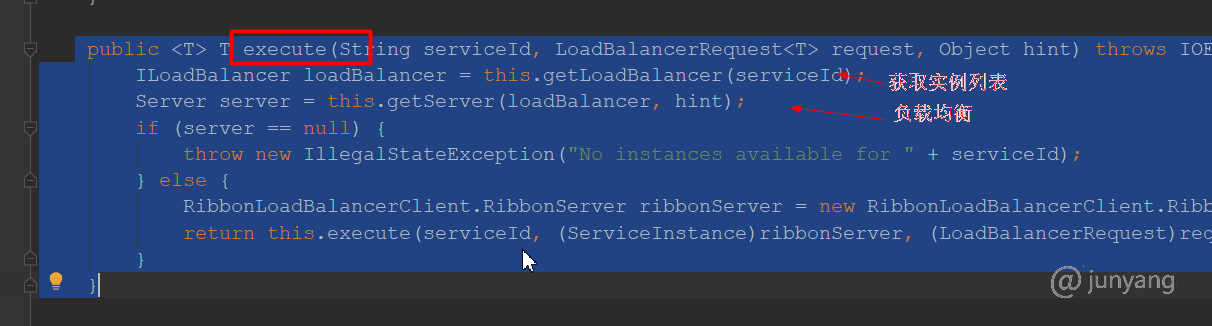
负载均衡
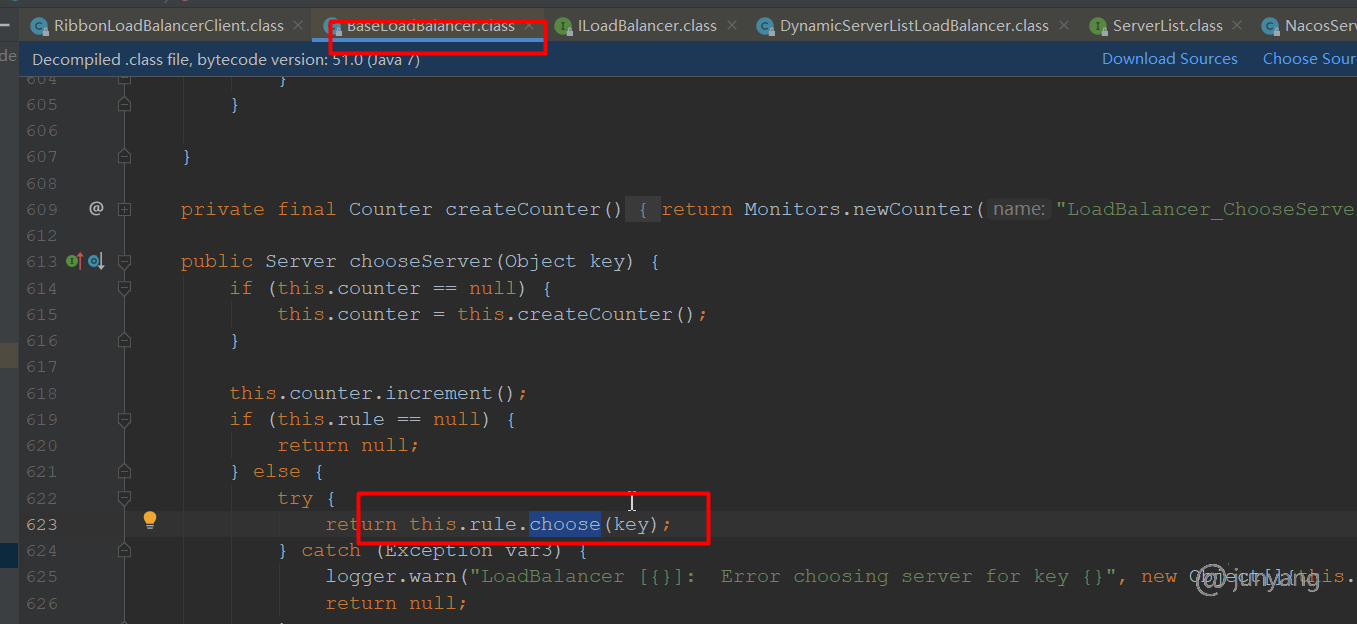
Ribbon核心组件IRule:根据特定算法从服务列表中选取一个需要访问的服务;
其中IRule是一个接口,有七个自带的落地实现类,可以实现不同的负载均衡算法规则: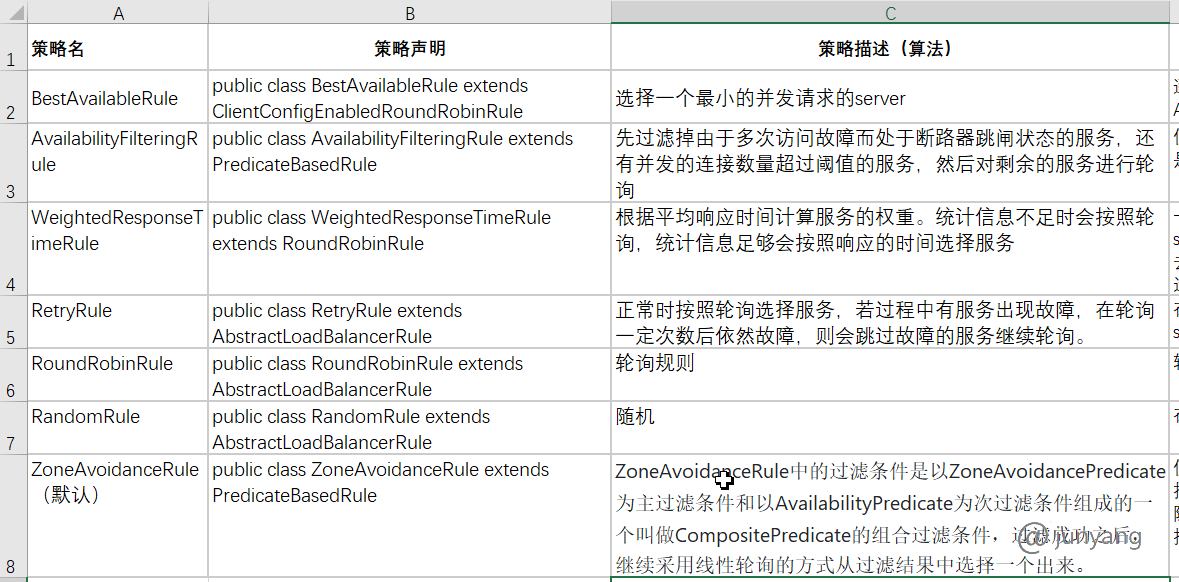
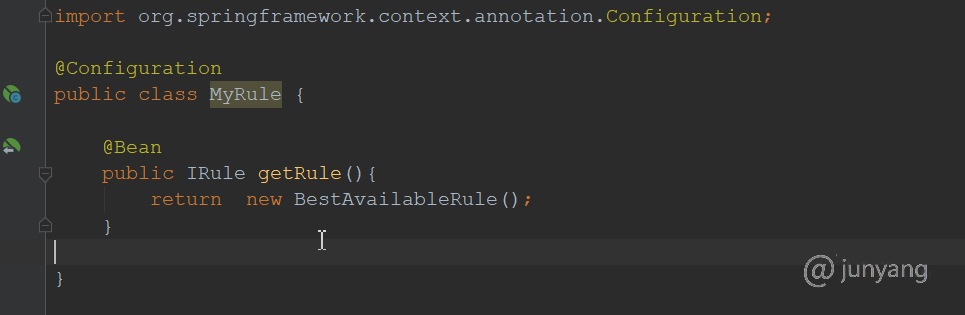
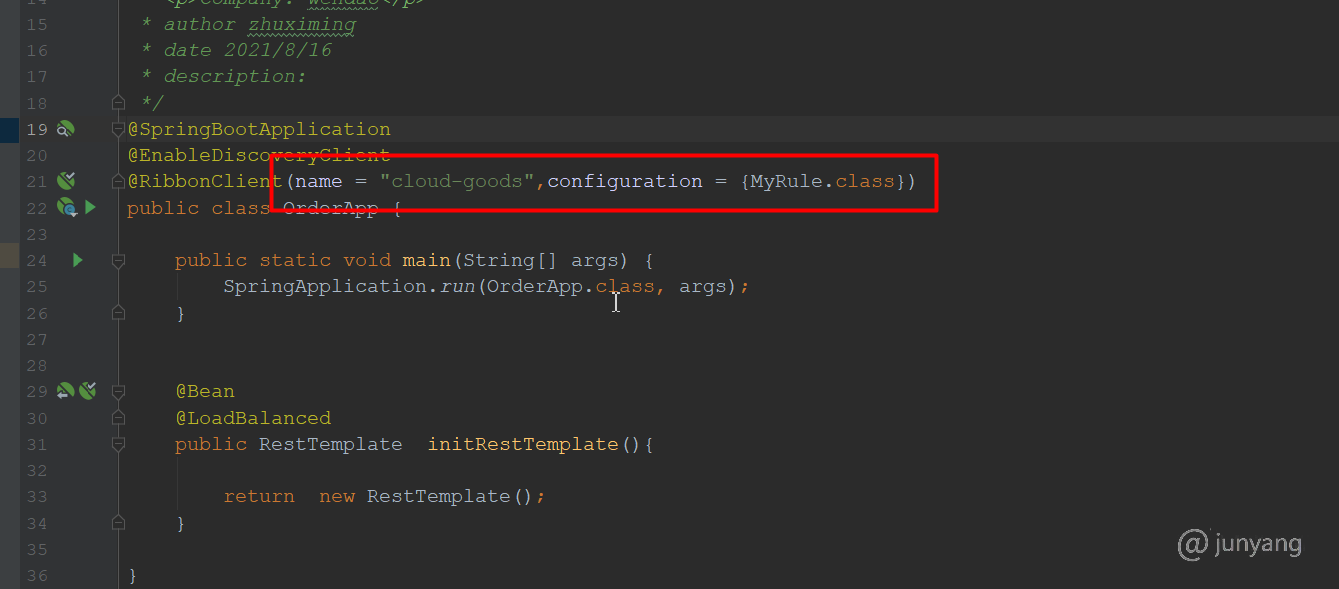
6.5:切换Ribbon负载均衡策略
6.6:服务实例列表同步更新
DynamicServerListLoadBalancer.updateListOfServers
//从nacos server获取最新的实例列表
NacosServerList.getServers问题:服务消费者一旦成功调用一次,nacos server关闭后还能继续访问?
七:nacos集群搭建
7.1:nacos集群架构
7.2:nacos集群搭建
伪集群:一台服务器搭建3台nacos 通过端口进行区分
7.2.1:集群规划
| 服务名 | ip | 端口 | 备注 |
|---|---|---|---|
| nacos实例1 | 192.168.25.101 | 8848 | |
| nacos实例2 | 192.168.25.101 | 8858 | |
| nacos实例3 | 192.168.25.101 | 8868 | |
| nginx | 192.168.25.101 | 80 | 反向代理nacos3个实例 |
| mysql | 192.168.25.101 | 3306 | 存储nacos数据 |
7.2.2:详细步骤
第一步:上传nacos包到linux服务器并解压
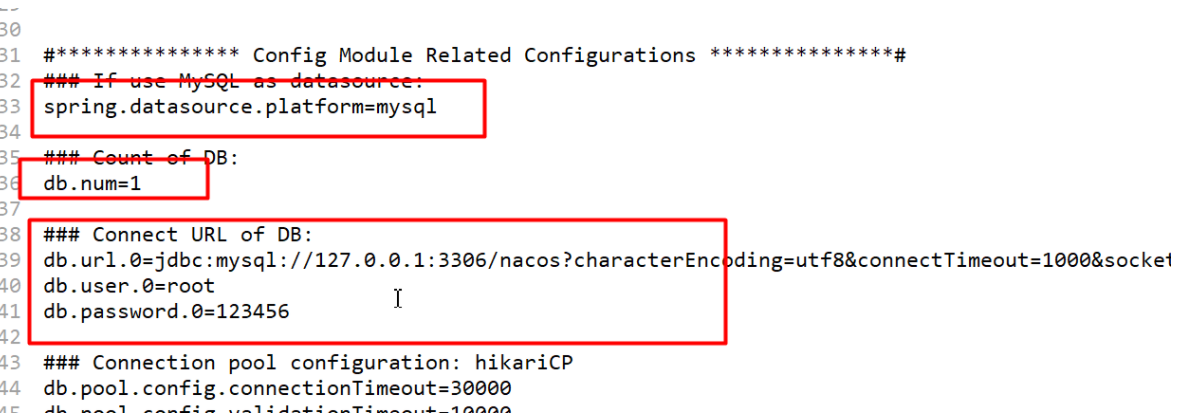
tar -zxvf nacos-server-1.4.1.tar.gz -C /export/server/第二步:修改nacos数据源
cd /export/server/nacos/conf/
vim application.properties
创建数据库及表
第三步:修改/export/server/nacos/bin/startup.sh 的JAVA_OPT
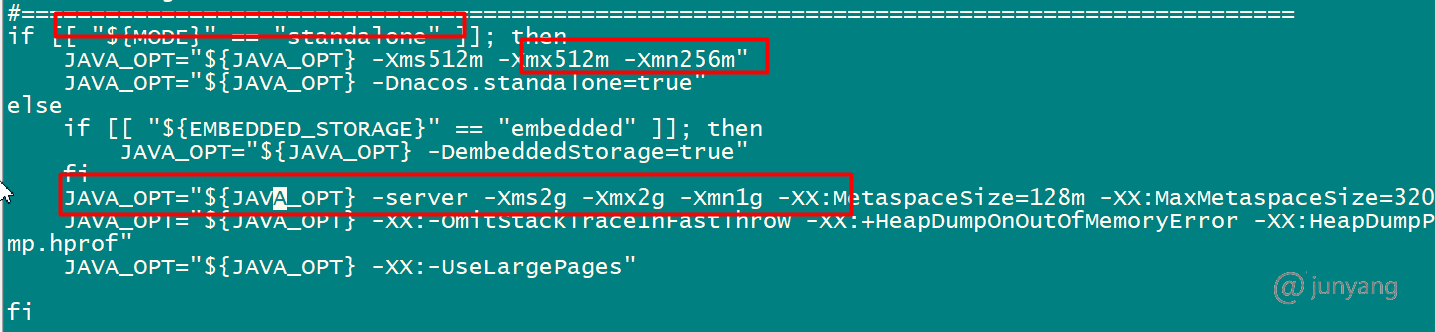
虚拟机内存调大到2G
原设置:
JAVA_OPT="${JAVA_OPT} -server -Xms2g -Xmx2g -Xmn1g -XX:MetaspaceSize=128m -XX:MaxMetaspaceSize=320m"
修改后:
JAVA_OPT="${JAVA_OPT} -server -Xms256m -Xmx256m -Xmn128m -XX:MetaspaceSize=128m -XX:MaxMetaspaceSize=160m"第四步:配置/export/server/nacos/conf/cluster.conf配置文件
修改集群配置文件的文件名
cp cluster.conf.example cluster.conf
192.168.25.101:8848
192.168.25.101:8858
192.168.25.101:8868第五步:复制三份,同时修改监听端口
[root@zhuxm01 server]# cp nacos/   nacos8848 -r
[root@zhuxm01 server]# cp nacos/   nacos8858 -r
[root@zhuxm01 server]# cp nacos/ nacos8868 -r第六步:分别启动nacos实例
创建nacos-cluster-startup.sh
sh /export/server/nacos8848/bin/startup.sh
sh /export/server/nacos8858/bin/startup.sh
sh /export/server/nacos8868/bin/startup.sh第七步:测试
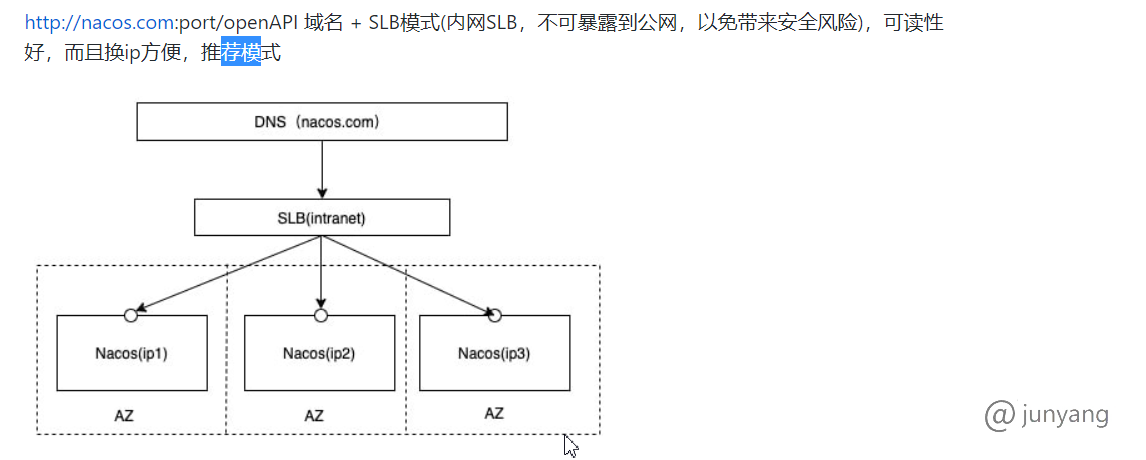
spring.cloud.nacos.discovery.server-addr=192.168.234.122:8848,192.168.234.122:8858,192.168.234.122:8868第八步:配置nginx反向代理(可选)
upstream  nacos-cluster {
       server    192.168.25.101:8848;
       server    192.168.25.101:8858;
       server    192.168.25.101:8868;
     }

server {
        listen       80;
        server_name  www.nacos.com;
        #charset koi8-r;
        #access_log  logs/host.access.log  main;
        location / {
           proxy_pass http://nacos-cluster/;
        }
}八 Springcloud openfeign
介绍:作为Spring Cloud的子项目之一,Spring Cloud OpenFeign 是一种声明式、模板化的 HTTP 客户端,在 Spring Cloud 中使用 OpenFeign,可以做到使用 HTTP请求远程服务时能与调用本地方法一样的编码体验,开发者完全感知不到这是远程方法,更感知不到这是个 HTTP 请求。同时OpenFeign通过集成Ribbon实现客户端的负载均衡
nacos-server : 注册中心,解决是服务的注册与发现
Ribbon:客户端负载均衡器,解决的是服务集群负载均衡的问题
OpenFeign:声明式 HTTP 客户端 、代替Resttemplate组件,实现远程调用
8.1 快速入门
第一步:添加依赖
        <!--添加远程调用组件  openfeign 的依赖-->
        <dependency>
            <groupId>org.springframework.cloud</groupId>
            <artifactId>spring-cloud-starter-openfeign</artifactId>
</dependency>第二步: 在启动开启 feign ,并扫描 feign接口的包
@EnableFeignClients(basePackages = {"com.glls.customer.feign"})
第三步:创建feign接口
@FeignClient(value = "cloud-search")        // 指定远程调用的服务是谁
//@RequestMapping("/search")
public interface SearchApi {

	// 注意 这些方法的定义方式
    @PostMapping("/search/save")
    public Map save(@RequestBody Goods goods);

}第四步:消费者 调用 feign 接口
    @Autowired
    private SearchApi searchApi;    // 注入 feign 接口  像调用本地接口一样 进行调用

    @RequestMapping("/save")
    public R save(){
        //feign接口远程调用其他服务
        Map save = searchApi.save(new Goods(1L,"手机",88.8));

        return R.ok().data(save);
}第五步 提前准备好的远程接口 cloud-search 服务
@PostMapping("/save")
    public Map save(@RequestBody Goods goods){

        System.out.println("调用了搜素服务的保存接口");
        System.out.println(goods);
        return new HashMap(){{
            put("isSuccess",true);
            put("msg","save success");
        }};
    }

    @PostMapping(value = "/update")
    public Map update(@RequestBody Goods goods) {

        System.out.println(goods);
        return new HashMap(){{
            put("isSuccess",true);
            put("msg","update success");
        }};

    }


    @GetMapping(value = "/delete")
    public Map deleteById(@RequestParam(value = "id") Long id) {
        System.out.println("删除id为"+id+"的积分信息");
        return new HashMap(){{
            put("isSuccess",true);
            put("msg","delete success");
        }};

    }

    @GetMapping(value = "/{id}")
    public Goods findJifenById(@PathVariable(value = "id") Long id) {
        System.out.println("已经查询到"+id+"积分数据");
        return new Goods(1L, "笔记本电脑",66.66);
    }


    @GetMapping(value = "/search")
    public Goods search(Long id,String name) {
        System.out.println("uid:"+id+"type:"+name);
        return new Goods(id, name,66.66);
    }


    @PostMapping(value = "/searchByEntity")
    public R searchMap(@RequestBody  Goods goods) {

        System.out.println(goods);

        List<Goods> goodsList = new ArrayList<>();
        goodsList.add(new Goods(110L,"手机",88.8));
        goodsList.add(new Goods(111L,"电脑",66.6));
        return  R.ok();
}8.2 feign 返回托底数据
Fallback可以帮助我们在使用Feign去调用另外一个服务时,如果出现了问题,走服务降级,返回一个错误数据,避免功能因为一个服务出现问题,全部失效。
比如 现在 customer 调用search ,search 出问题了 ,为了不影响 customer ,可以 在 customer 中 进行 服务降级 操作
4.4.1 FallBack方式
在 customer 下 创建 fallback 包 ,包下创建一个POJO类,实现Client接口。
@Component
public class SearchClientFallBack implements SearchClient {
    @Override
    public String search() {
        return "出现问题啦!!!";
    }

    @Override
    public Customer findById(Integer id) {
        return null;
    }

    @Override
    public Customer getCustomer(Integer id, String name) {
        return null;
    }

    @Override
    public Customer save(Customer customer) {
        return null;
    }
}修改CLient接口中的注解,添加一个属性。
@FeignClient(value = "SEARCH",fallback = SearchClientFallBack.class)添加一个配置文件。
# feign和hystrix组件整合
feign:
  hystrix:
    enabled: true


#  然后  使用customer 通过 feign 接口  调用  search ,让search 出异常 ,  开始测试
# 调用 search 这个 方法   ,发现  返回的 是 SearchClientFallBack   中的 方法  返回值
 @GetMapping("/search")
    public String search(){
        int i = 5/0;
        return "search"+port;
}8.3 feign的常用配置
# feign和hystrix组件整合
feign:
  hystrix:
    enabled: true
  client:
    config:
      cloud-search:
        connectTimeout: 1000
        readTimeout: 2000
      default:
        connectTimeout: 1000
        readTimeout: 3000
// 当 开启 在  feign 中 使用 hystrix  时   下面的超时配置  优先级较高
hystrix:
  command:
    default:
      execution:
        isolation:
          thread:
timeoutInMilliseconds: 3000九 配置中心
1.概念介绍
配置文件集中管理 即时生效
nacos的领域模型
2.添加依赖
<dependency>
     <groupId>com.alibaba.cloud</groupId>
     <artifactId>spring-cloud-starter-alibaba-nacos-config</artifactId>
</dependency>3.创建bootstrap.yml
spring:
  application:
    name: cloud-customer
  cloud:
    nacos:
      config:
        server-addr: 127.0.0.1:8848    # 配置中心的地址
        namespace: java2110    #命名空间
file-extension: yml #文件扩展名4.在配置中心 创建远程的配置文件
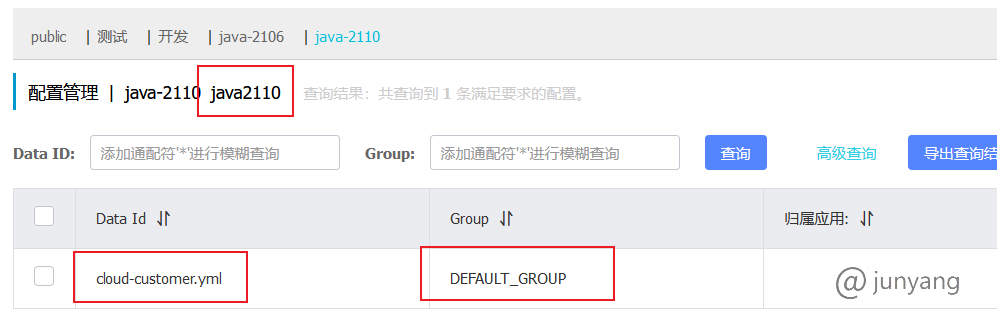
要明确 配置文件的 namespace group 以及 dataId ,这三个值 是从上面的 bootstrap.yml 得到的,
上面只指定了namespace 所以 group 和 dataId就使用默认值,group的默认值是 DEFAULT_GROUP,dataId的默认值是
是通过公式来拼接
spring:
  application:
    name: cloud-customer      # ${prefix}
  cloud:
    nacos:
      config:
        server-addr: 127.0.0.1:8848    # 配置中心的地址
        namespace: java2110    #命名空间
file-extension: yml #文件扩展名 ${file-extension}咱们没有在 这里设置 spring.profiles.active 所以 最终得到的 领域模型: namespace:java2110 group:DEFAULT_GROUP dataId:cloud-customer.yml
5.测试
在远程配置文件 编写配置 ,在controller 中证明读取了这个配置
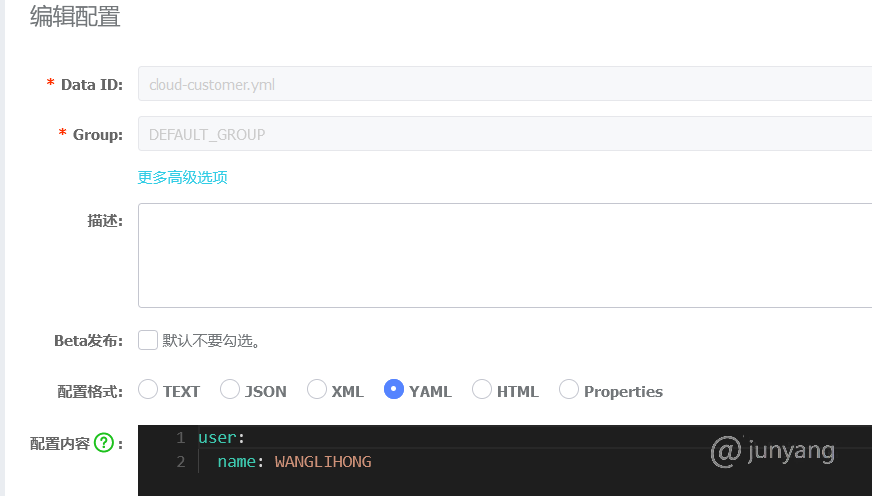
    @Value("${user.name}")
    private String name;

    @RequestMapping("/config")
    public String testConfig(){

        return name;
}然后 发现 在远程更改配置后,服务没有感知到 ,需要在 controller 上添加 @RefreshScope
6.在配置中心 添加更多的配置文件
spring:
  application:
    name: cloud-customer
  cloud:
    nacos:
      config:
        server-addr: 127.0.0.1:8848
        namespace: java2110
        file-extension: yml
        extension-configs[0]:
          group: common
          data-id: common.yml
          refresh: true