oss 阿里云对象存储
1.引入
文件存储解决方案对比
2.登录阿里云 开通oss对象存储服务
2.1简介
对象存储服务 object storage service 是一种海量 安全 低成本 高可靠的云存储服务,适合存放任意类型文件,容量和处理能力弹性扩展,多种存储类型供选择,全面优化存储成本。
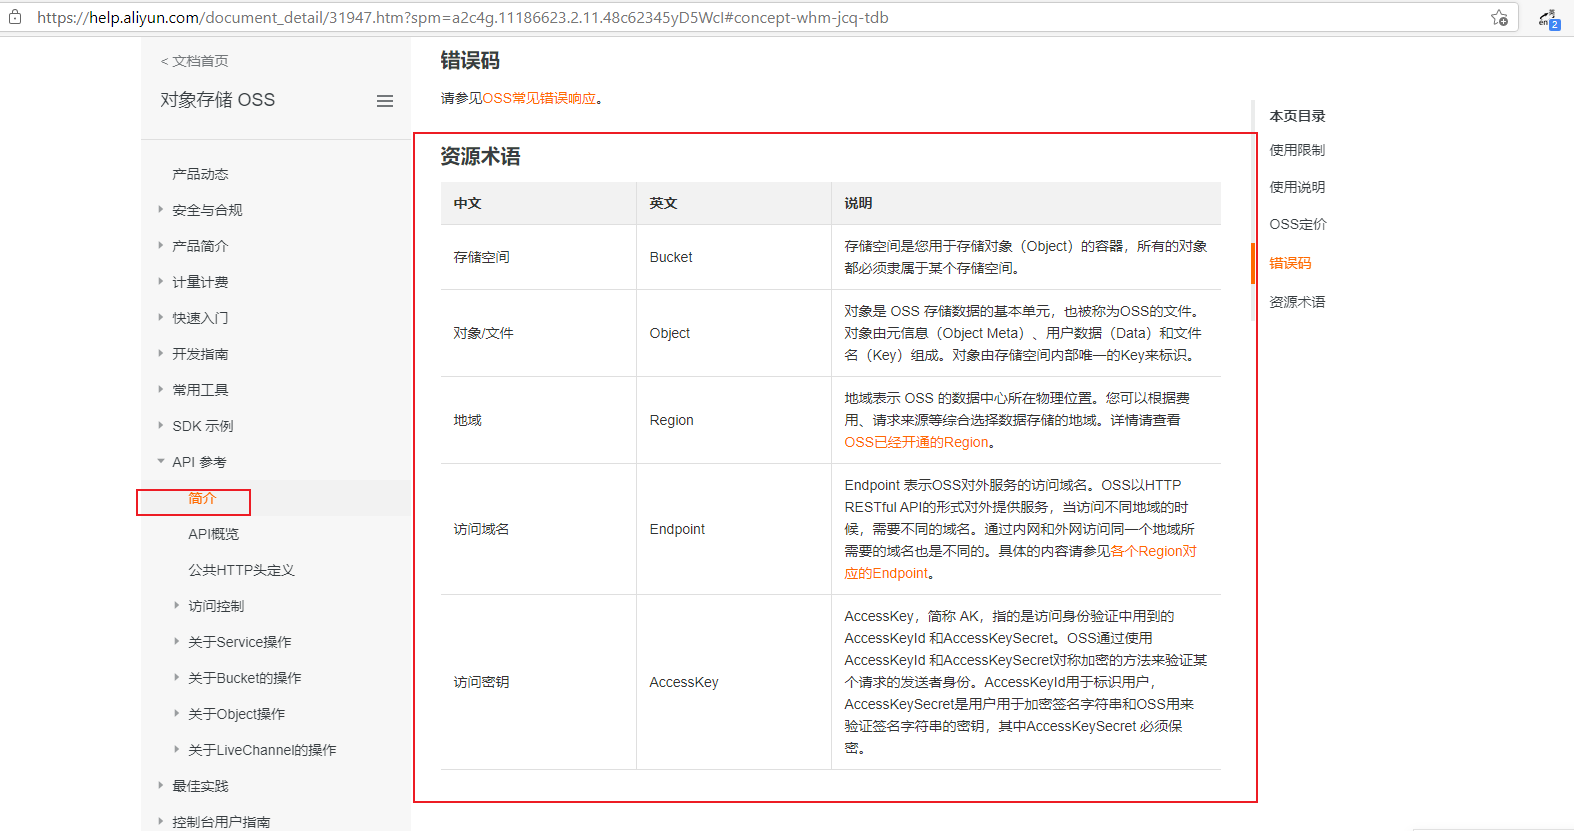
在帮助文档中心打开 对象存储 查看资源术语
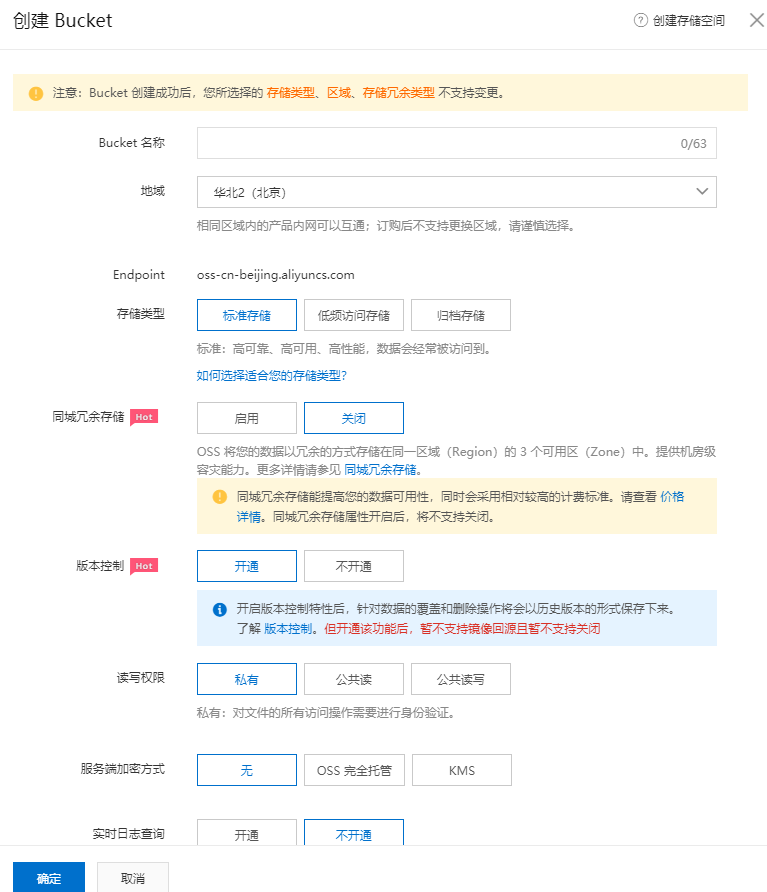
2.2创建bucket
上传文件 测试
点上传文件
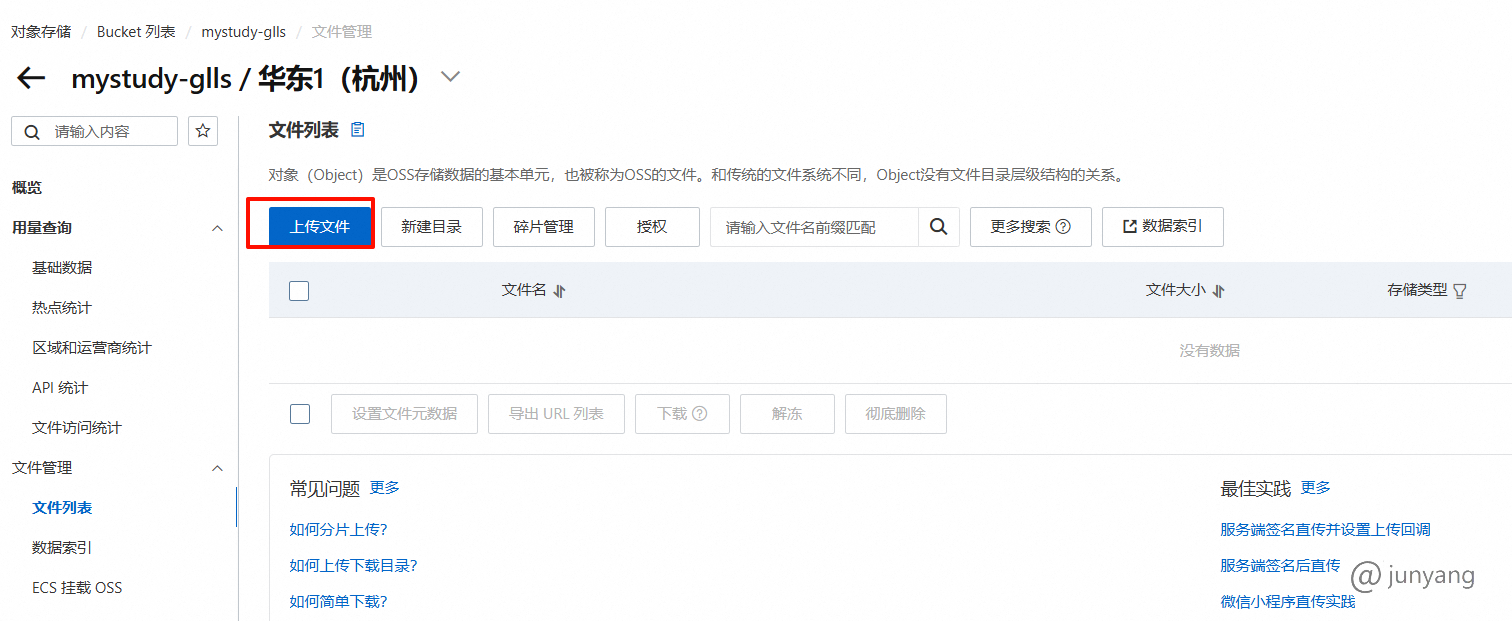
在上传的文件详情 查看文件的 地址 通过该地址 可以访问文件
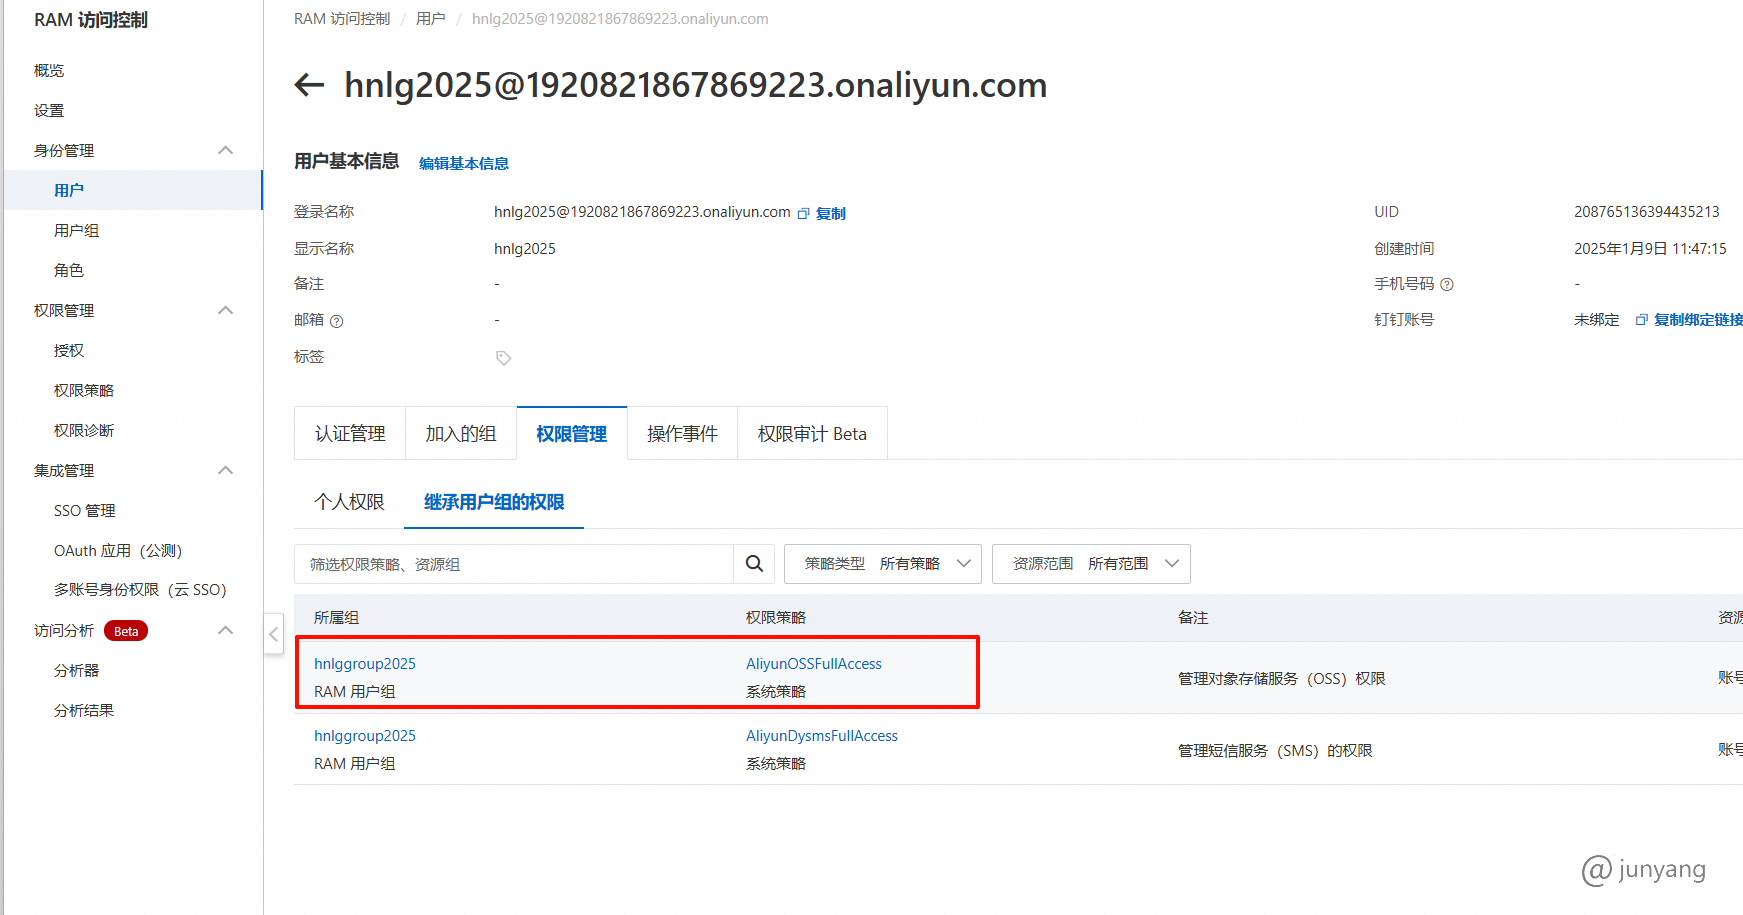
2.3 创建用户 并分配权限
目的 是拿到 AccessKeyId AccessKeySecret


将用户添加到 用户组, 没有用户组,就创建用户组,然后 给用户组添加 oss 的权限
3.查看java api 并测试
添加依赖
shell
		<dependency>
			<groupId>com.aliyun.oss</groupId>
			<artifactId>aliyun-sdk-oss</artifactId>
			<version>3.10.2</version>
		</dependency>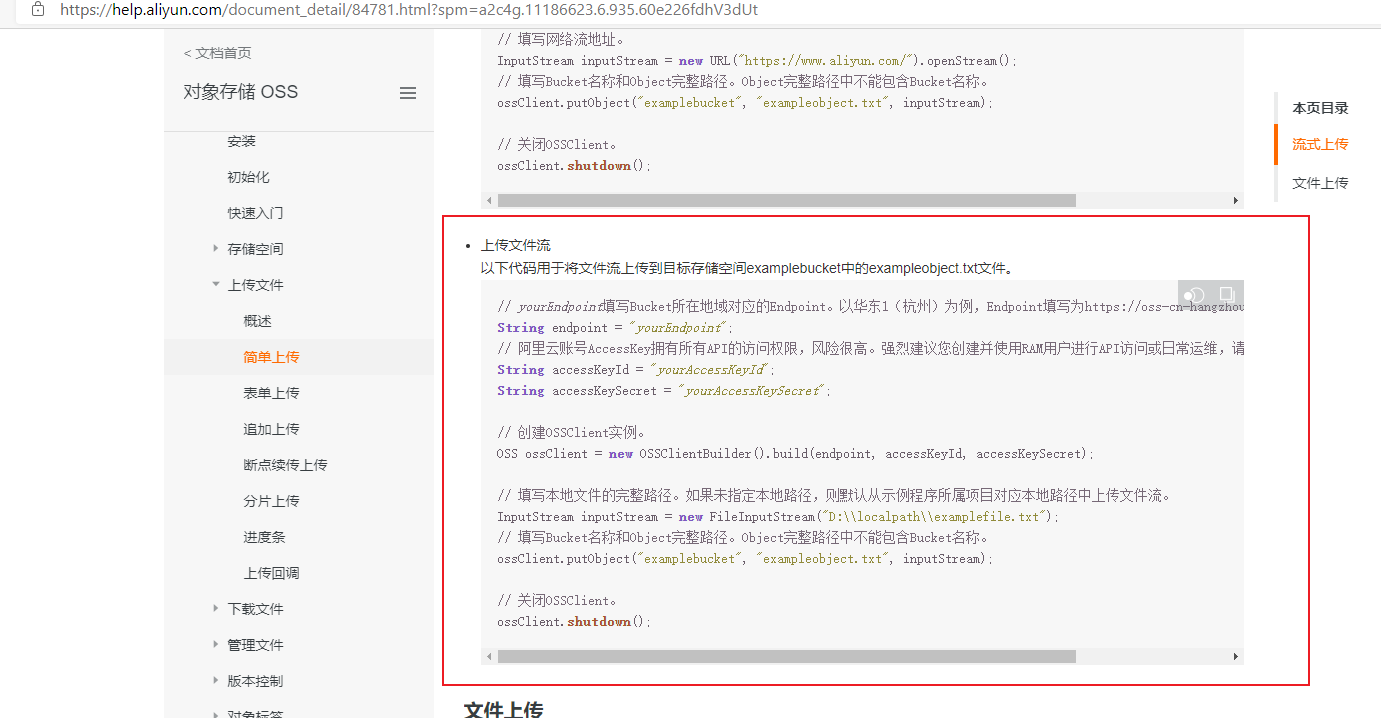
java
	@Test
	void  testUpload() throws FileNotFoundException {
		// yourEndpoint填写Bucket所在地域对应的Endpoint。以华东1(杭州)为例,Endpoint填写为https://oss-cn-hangzhou.aliyuncs.com。
		String endpoint = "oss-cn-beijing.aliyuncs.com";
// 阿里云账号AccessKey拥有所有API的访问权限,风险很高。强烈建议您创建并使用RAM用户进行API访问或日常运维,请登录RAM控制台创建RAM用户。
		String accessKeyId = "xxx";
		String accessKeySecret = "xxx";

// 创建OSSClient实例。
		OSS ossClient = new OSSClientBuilder().build(endpoint, accessKeyId, accessKeySecret);

// 填写本地文件的完整路径。如果未指定本地路径,则默认从示例程序所属项目对应本地路径中上传文件流。
		InputStream inputStream = new FileInputStream("D:\\2.jpg");
// 填写Bucket名称和Object完整路径。Object完整路径中不能包含Bucket名称。
		ossClient.putObject("gmall-glls", "2.jpg", inputStream);

// 关闭OSSClient。
		ossClient.shutdown();
}4.使用springcloud alibaba oss
spring-cloud-alibaba/README-zh.md at master · alibaba/spring-cloud-alibaba · GitHub
版本变化大
早一点的版本
shell
	<dependency>
			<groupId>com.alibaba.cloud</groupId>
			<artifactId>spring-cloud-starter-alicloud-oss</artifactId>
			<version>2.2.0.RELEASE</version>
</dependency>yml
#对应的配置文件
spring:

  cloud:
    alicloud:
      access-key: xxx
      secret-key: xxx
      oss:
        endpoint: oss-cn-beijing.aliyuncs.com
bucket: gmall-glls现在版本 使用这个
shell
		<dependency>
			<groupId>com.alibaba.cloud</groupId>
			<artifactId>aliyun-oss-spring-boot-starter</artifactId>
		</dependency>


	<dependencyManagement>
		<dependencies>
			<!-- Aliyun Spring Boot dependencies -->
			<dependency>
				<groupId>com.alibaba.cloud</groupId>
				<artifactId>aliyun-spring-boot-dependencies</artifactId>
				<version>1.0.0</version>
				<type>pom</type>
				<scope>import</scope>
			</dependency>
		</dependencies>
</dependencyManagement>yml
#对应的配置文件
alibaba:
  cloud:
    secret-key: xxx
    access-key: xxx
    oss:
      endpoint: oss-cn-beijing.aliyuncs.com     # 地域域名
bucket: gmall-glls # bucket 名称java
@Autowired
	private OSSClient ossClient;


	@Test
	void  testUpload() throws FileNotFoundException {
		// yourEndpoint填写Bucket所在地域对应的Endpoint。以华东1(杭州)为例,Endpoint填写为https://oss-cn-hangzhou.aliyuncs.com。
		//String endpoint = "oss-cn-beijing.aliyuncs.com";
// 阿里云账号AccessKey拥有所有API的访问权限,风险很高。强烈建议您创建并使用RAM用户进行API访问或日常运维,请登录RAM控制台创建RAM用户。
		//String accessKeyId = "xxx";
		//String accessKeySecret = "xxx";

// 创建OSSClient实例。
		//OSS ossClient = new OSSClientBuilder().build(endpoint, accessKeyId, accessKeySecret);

// 填写本地文件的完整路径。如果未指定本地路径,则默认从示例程序所属项目对应本地路径中上传文件流。
		InputStream inputStream = new FileInputStream("D:\\2.jpg");
// 填写Bucket名称和Object完整路径。Object完整路径中不能包含Bucket名称。
		ossClient.putObject("gmall-glls", "3.jpg", inputStream);

// 关闭OSSClient。
		ossClient.shutdown();
}5.实战中文件上传方式
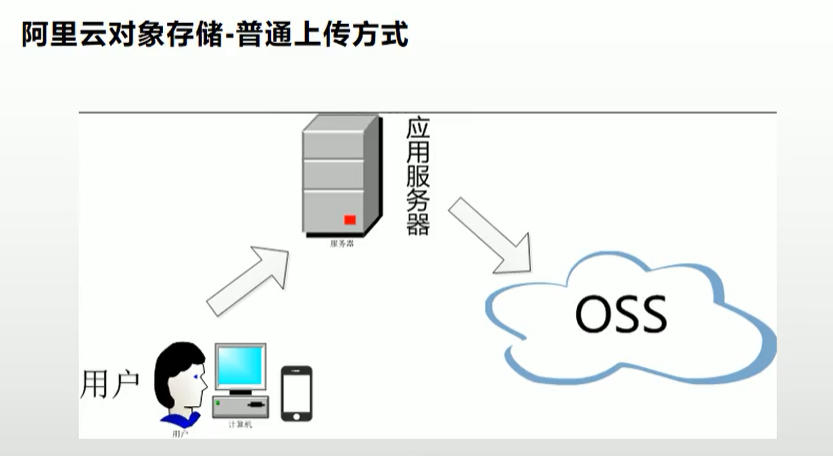
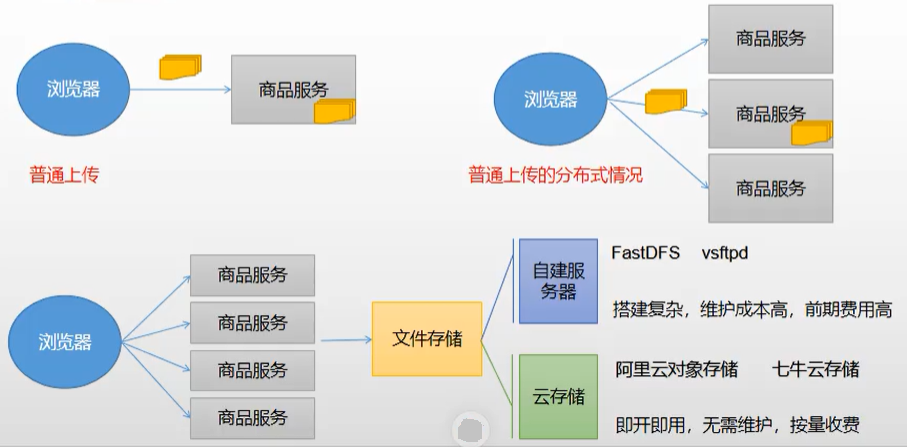
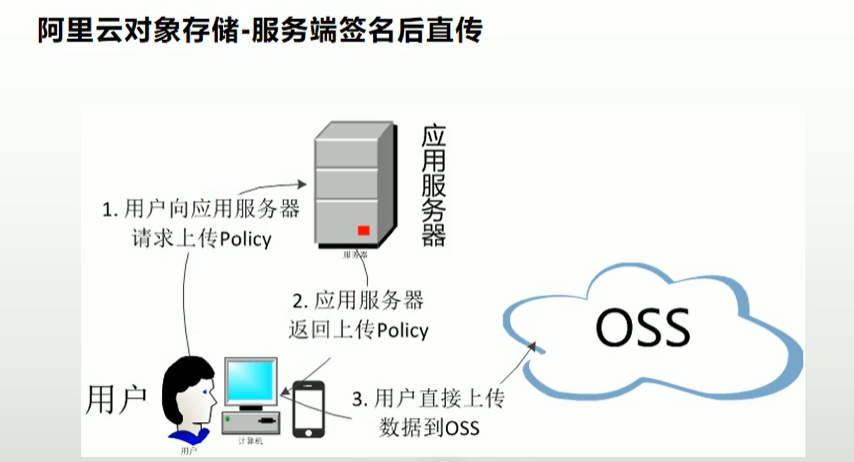
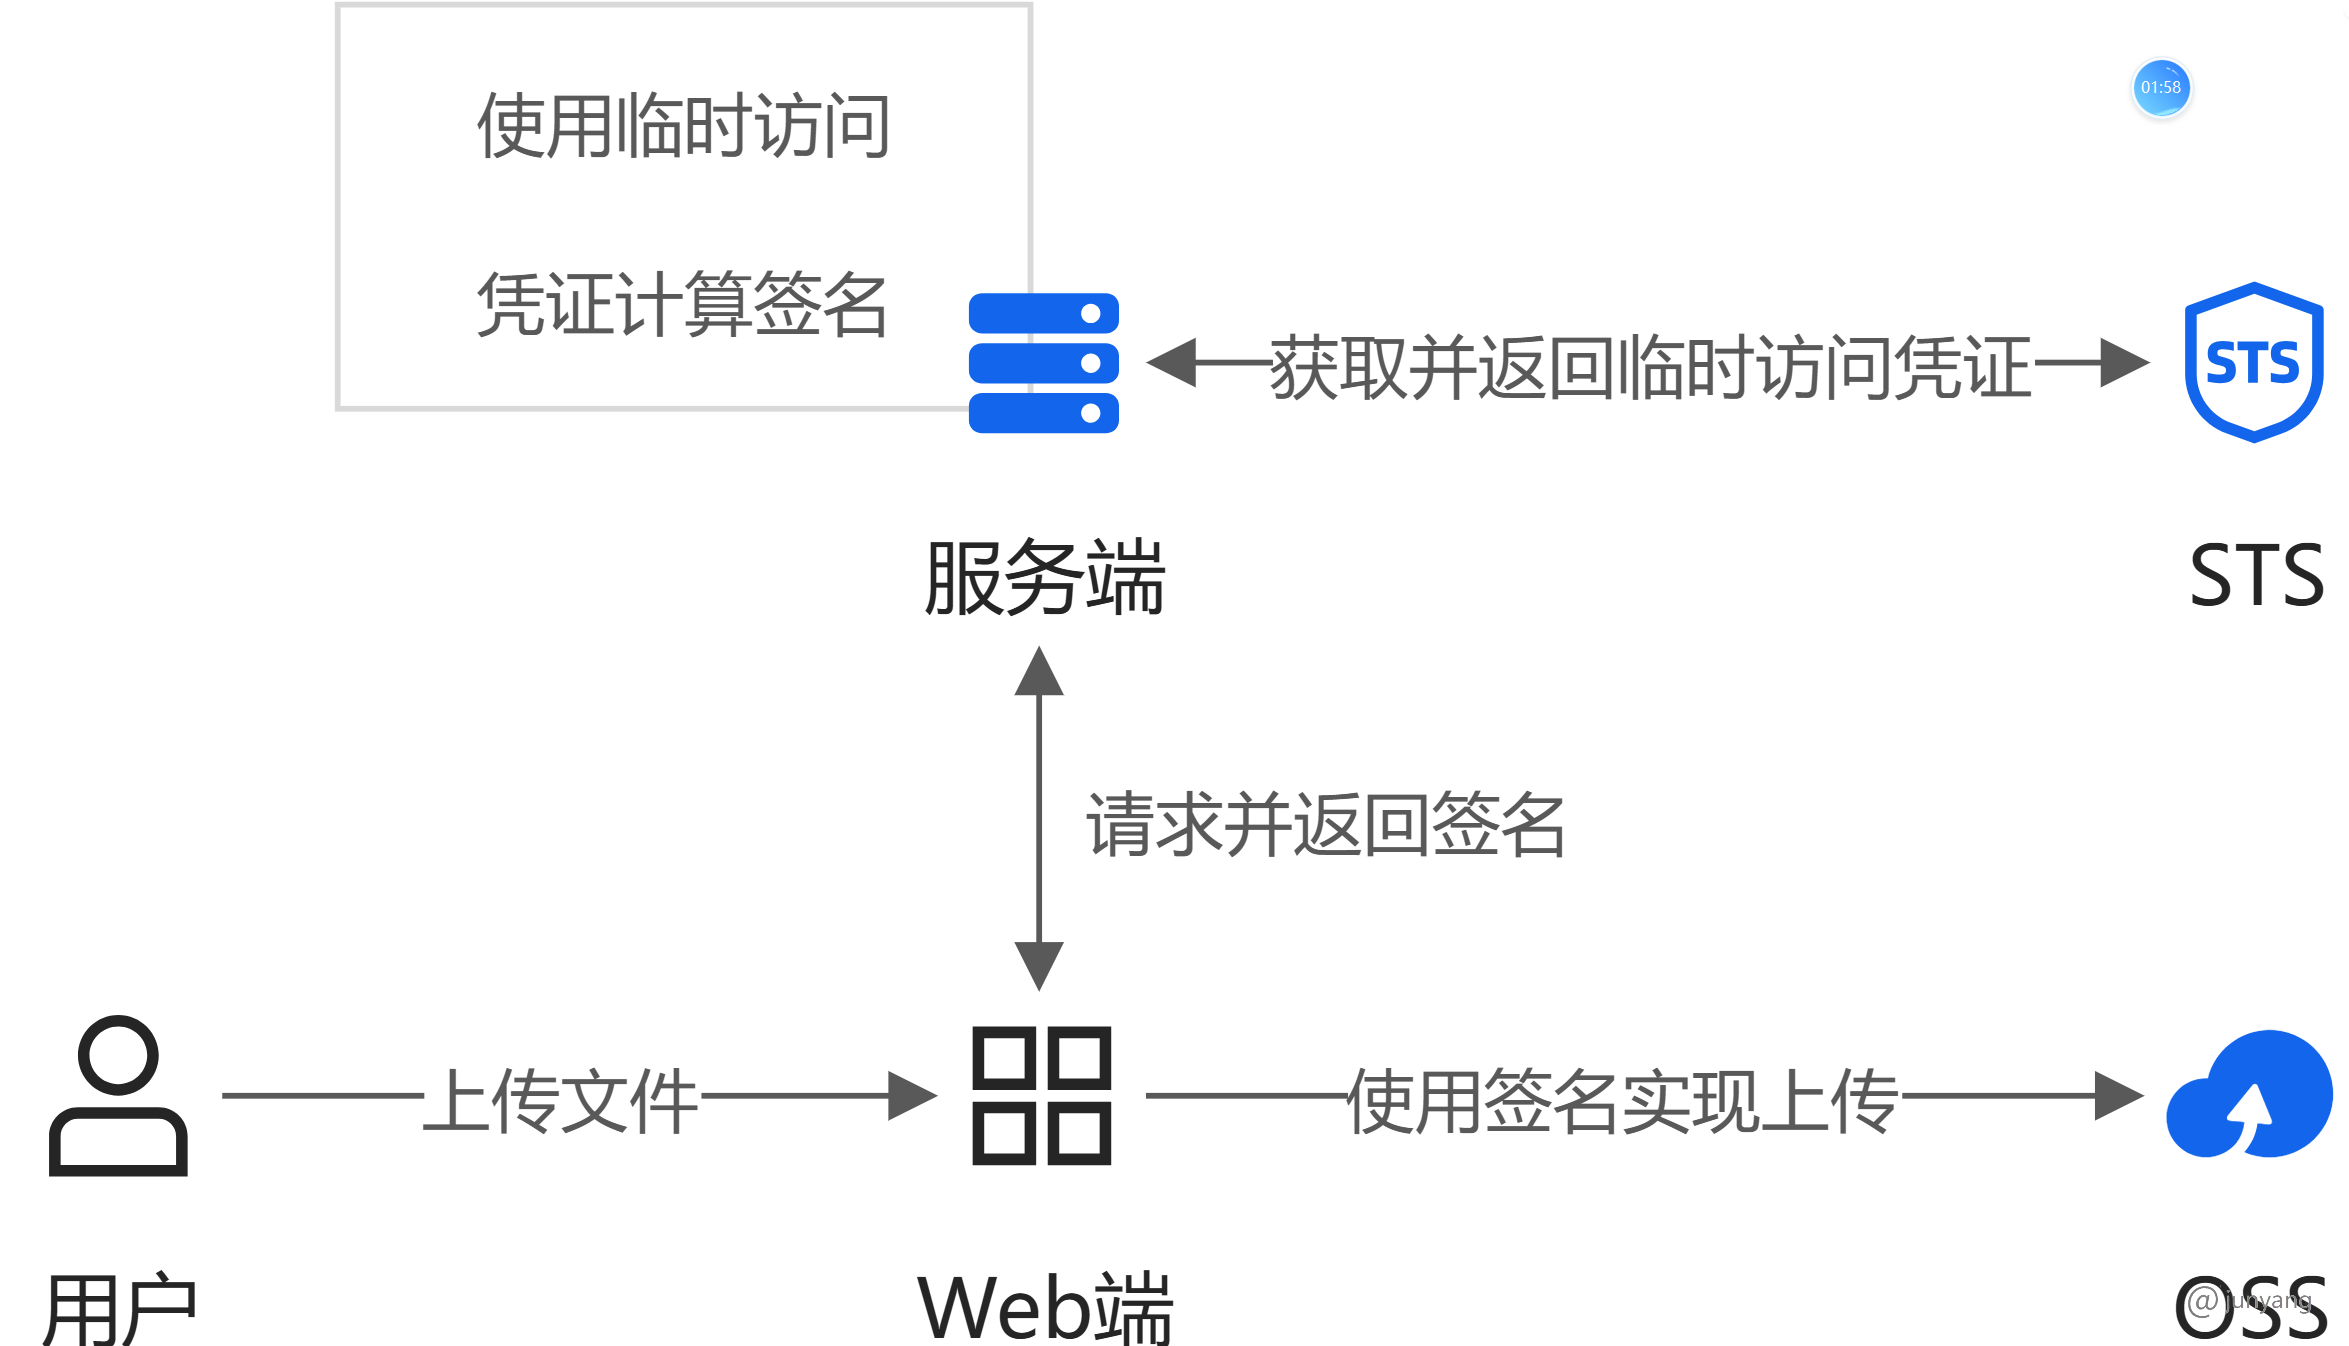
普通的上传方式 是 浏览器 把文件传给咱们的后台程序,后台程序 再传给阿里云文件服务器,这种做法 大大占用了咱们的后台程序资源,
所以 我们希望
1.在后端工程添加依赖

shell
		<dependency>
			<groupId>com.alibaba.cloud</groupId>
			<artifactId>aliyun-oss-spring-boot-starter</artifactId>
		</dependency>


	<dependencyManagement>
		<dependencies>
			<!-- Aliyun Spring Boot dependencies -->
			<dependency>
				<groupId>com.alibaba.cloud</groupId>
				<artifactId>aliyun-spring-boot-dependencies</artifactId>
				<version>1.0.0</version>
				<type>pom</type>
				<scope>import</scope>
			</dependency>
		</dependencies>
</dependencyManagement>2.创建向前端返回 策略的 接口
java
package com.glls.sbvue.controller;
import com.aliyun.oss.OSS;
import com.aliyun.oss.common.utils.BinaryUtil;
import com.aliyun.oss.model.MatchMode;
import com.aliyun.oss.model.PolicyConditions;
import com.glls.sbvue.anno.UnInterception;
import com.glls.sbvue.common.R;
import org.springframework.beans.factory.annotation.Value;
import org.springframework.web.bind.annotation.RequestMapping;
import org.springframework.web.bind.annotation.RestController;
import javax.annotation.Resource;
import java.text.SimpleDateFormat;
import java.util.Date;
import java.util.LinkedHashMap;
import java.util.Map;
/**
* @date 2023/5/23
* @desc
*/
@RestController
public class OssController {
@Resource
OSS ossClient;
@Value("${alibaba.cloud.oss.endpoint}")
private String endpoint;
@Value("${alibaba.cloud.oss.bucket}")
private String bucket;
@Value("${alibaba.cloud.access-key}")
private String accessId;
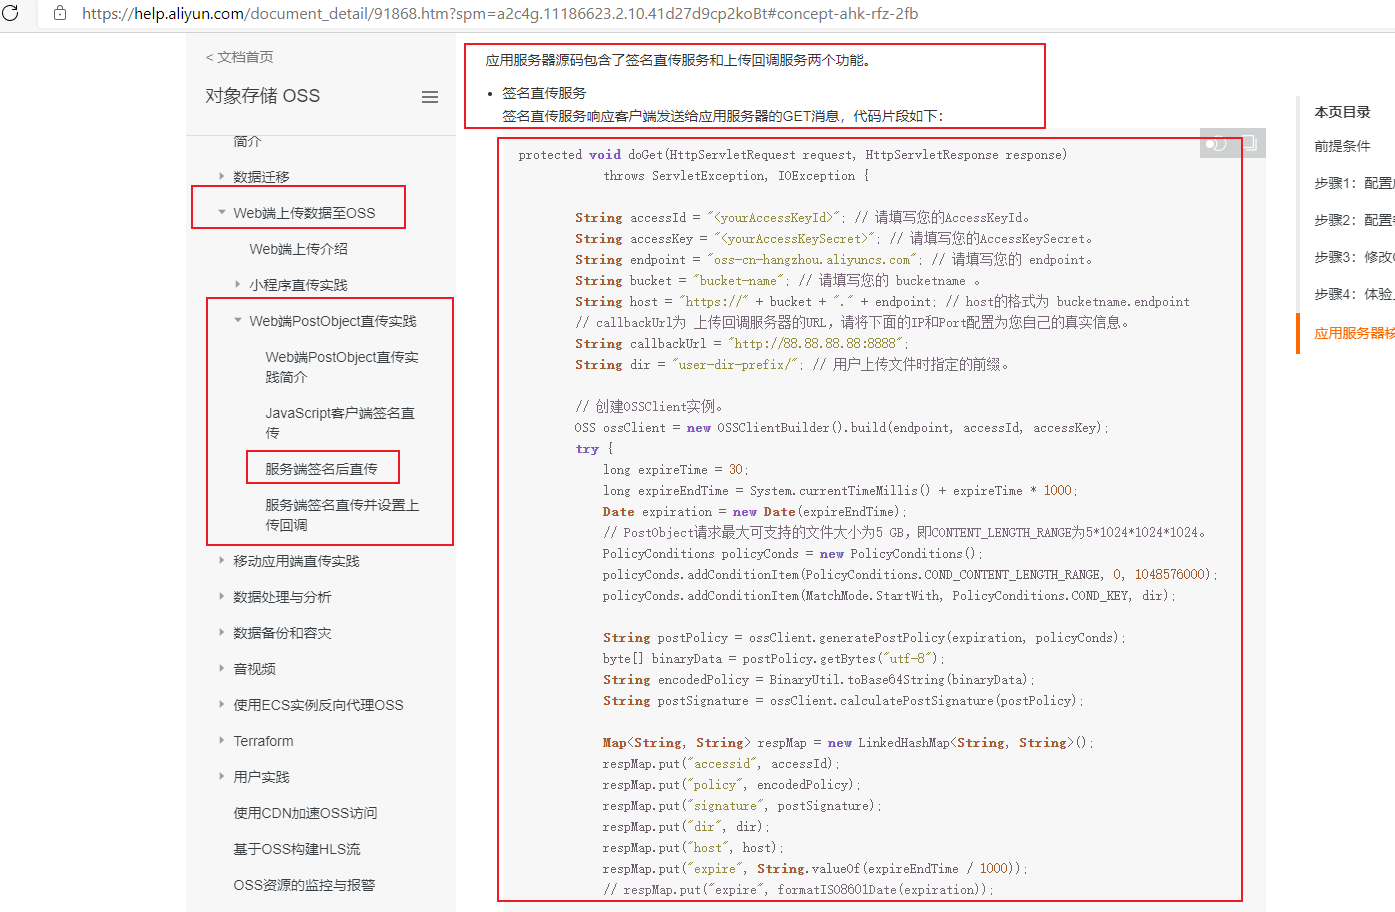
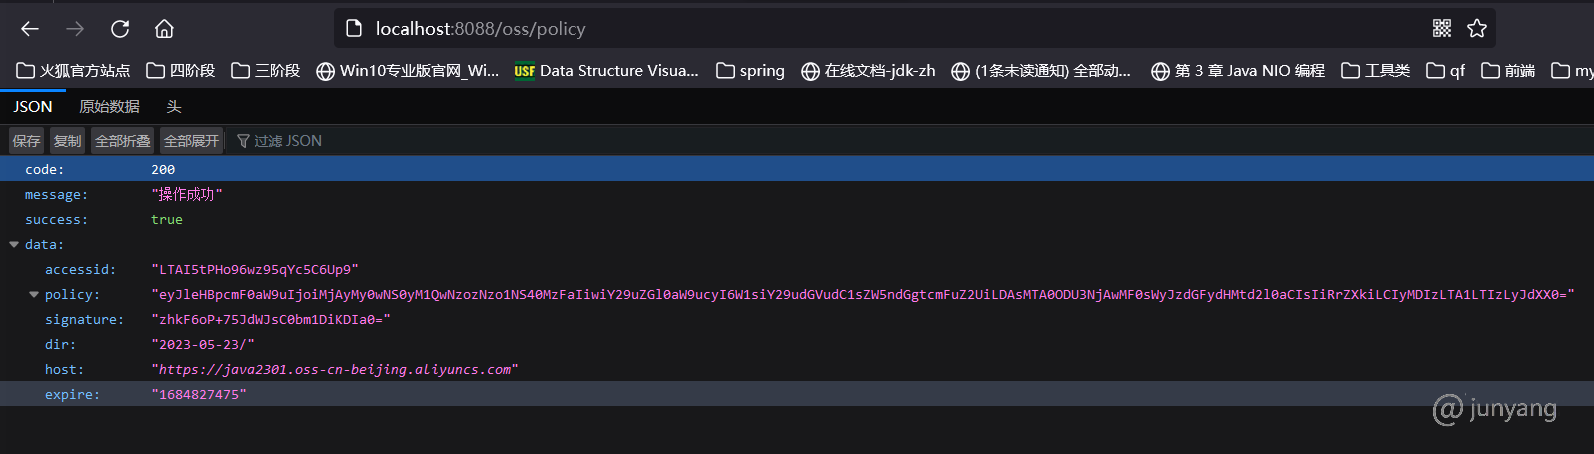
@RequestMapping("/oss/policy")
@UnInterception
public R policy() {
String host = "https://" + bucket + "." + endpoint; // host的格式为 bucketname.endpoint
// callbackUrl为 上传回调服务器的URL,请将下面的IP和Port配置为您自己的真实信息。
// String callbackUrl = "http://88.88.88.88:8888";
String format = new SimpleDateFormat("yyyy-MM-dd").format(new Date());
String dir = format + "/"; // 用户上传文件时指定的前缀。
Map<Object, Object> respMap = null;
try {
long expireTime = 30;
long expireEndTime = System.currentTimeMillis() + expireTime * 1000;
Date expiration = new Date(expireEndTime);
PolicyConditions policyConds = new PolicyConditions();
policyConds.addConditionItem(PolicyConditions.COND_CONTENT_LENGTH_RANGE, 0, 1048576000);
policyConds.addConditionItem(MatchMode.StartWith, PolicyConditions.COND_KEY, dir);
String postPolicy = ossClient.generatePostPolicy(expiration, policyConds);
byte[] binaryData = postPolicy.getBytes("utf-8");
String encodedPolicy = BinaryUtil.toBase64String(binaryData);
String postSignature = ossClient.calculatePostSignature(postPolicy);
respMap = new LinkedHashMap<Object, Object>();
respMap.put("accessid", accessId);
respMap.put("policy", encodedPolicy);
respMap.put("signature", postSignature);
respMap.put("dir", dir);
respMap.put("host", host);
respMap.put("expire", String.valueOf(expireEndTime / 1000));
// respMap.put("expire", formatISO8601Date(expiration));
// 下面是 回调 和 以跨域的方式响应数据 咱们配置过跨域了 所以这里注释掉
/* JSONObject jasonCallback = new JSONObject();
jasonCallback.put("callbackUrl", callbackUrl);
jasonCallback.put("callbackBody",
"filename=${object}&size=${size}&mimeType=${mimeType}&height=${imageInfo.height}&width=${imageInfo.width}");
jasonCallback.put("callbackBodyType", "application/x-www-form-urlencoded");
String base64CallbackBody = BinaryUtil.toBase64String(jasonCallback.toString().getBytes());
respMap.put("callback", base64CallbackBody);
JSONObject ja1 = JSONObject.fromObject(respMap);
// System.out.println(ja1.toString());
response.setHeader("Access-Control-Allow-Origin", "*");
response.setHeader("Access-Control-Allow-Methods", "GET, POST");
response(request, response, ja1.toString());*/
} catch (Exception e) {
// Assert.fail(e.getMessage());
System.out.println(e.getMessage());
}
return R.ok().data(respMap);
}
}配置文件 application.yml
shell
#对应的配置文件
alibaba:
  cloud:
    secret-key: xxx
    access-key: xxx
    oss:
      endpoint: oss-cn-beijing.aliyuncs.com
bucket: gmall-glls访问 这个 接口 返回数据
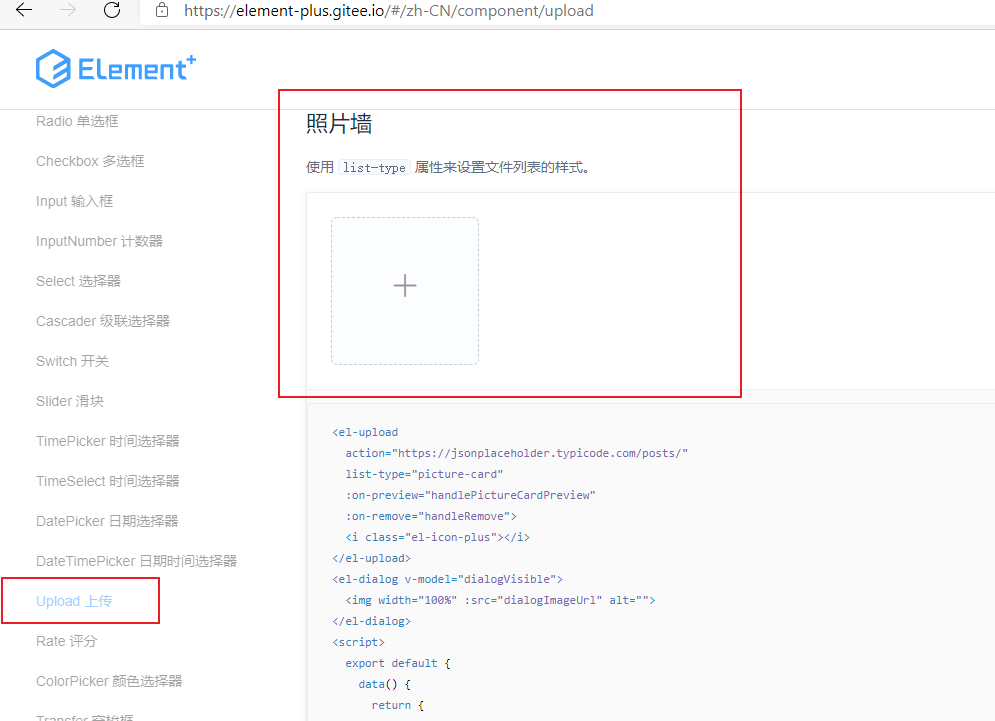
这个数据 写给前端,前端 咱们使用 element-ui 的文件上传组件
3.封装的多文件上传组件
multiUpload.vue
html
<template>
  <div>
    <el-upload
      action="http://gmall-glls.oss-cn-beijing.aliyuncs.com"
      :data="dataObj"
      list-type="picture-card"      //上传组件的样式
      :file-list="fileList"        //文件列表
      :before-upload="beforeUpload"       //文件上传之前 执行的 方法
      :on-remove="handleRemove"     //点删除的时候执行的方法
      :on-success="handleUploadSuccess"    // 上传成功执行的方法
      :on-preview="handlePreview"
      :limit="maxCount"
      :on-exceed="handleExceed"
    >
      <i class="el-icon-plus"></i>
    </el-upload>
    <el-dialog :visible.sync="dialogVisible">
      <img width="100%" :src="dialogImageUrl" alt />
    </el-dialog>
  </div>
</template>
<script>
import { policy } from "./policy";
import { getUUID } from '@/utils'
export default {
  name: "multiUpload",
  props: {
    //图片属性数组
    value: Array,
    //最大上传图片数量
    maxCount: {
      type: Number,
      default: 30
    }
  },
  data() {
    return {
      dataObj: {
        policy: "",
        signature: "",
        key: "",
        ossaccessKeyId: "",
        dir: "",
        host: "",
        uuid: ""
      },
      dialogVisible: false,
      dialogImageUrl: null
    };
  },
  computed: {
    fileList() {
      let fileList = [];
      for (let i = 0; i < this.value.length; i++) {
        fileList.push({ url: this.value[i] });
      }

      return fileList;
    }
  },
  mounted() {},
  methods: {
    emitInput(fileList) {
      let value = [];
      for (let i = 0; i < fileList.length; i++) {
        value.push(fileList[i].url);
      }
      this.$emit("input", value);
    },
    handleRemove(file, fileList) {
      this.emitInput(fileList);
    },
    handlePreview(file) {
      this.dialogVisible = true;
      this.dialogImageUrl = file.url;
    },
    beforeUpload(file) {
      let _self = this;
      return new Promise((resolve, reject) => {
        policy(_self)
          .then(response => {
            console.log("这是什么${filename}");
            _self.dataObj.policy = response.data.policy;
            _self.dataObj.signature = response.data.signature;
            _self.dataObj.ossaccessKeyId = response.data.accessid;
            _self.dataObj.key = response.data.dir + "/"+getUUID()+"_${filename}";
            _self.dataObj.dir = response.data.dir;
            _self.dataObj.host = response.data.host;
            resolve(true);
          })
          .catch(err => {
            console.log("出错了...",err)
            reject(false);
          });
      });
    },
    handleUploadSuccess(res, file) {
      this.fileList.push({
        name: file.name,
        // url: this.dataObj.host + "/" + this.dataObj.dir + "/" + file.name; 替换${filename}为真正的文件名
        url: this.dataObj.host + "/" + this.dataObj.key.replace("${filename}",file.name)
      });
      this.emitInput(this.fileList);
    },
    handleExceed(files, fileList) {
      this.$message({
        message: "最多只能上传" + this.maxCount + "张图片",
        type: "warning",
        duration: 1000
      });
    }
  }
};
</script>
<style>
</style>4.封装的单文件上传组件
singleUpload.vue
html
<template>
  <div>
    <el-upload
      action="http://java2301.oss-cn-beijing.aliyuncs.com"
      :data="dataObj"
      list-type="picture"
      :multiple="false" :show-file-list="showFileList"
      :file-list="fileList"
      :before-upload="beforeUpload"
      :on-remove="handleRemove"
      :on-success="handleUploadSuccess"
      :on-preview="handlePreview">
      <el-button size="small" type="primary">点击上传</el-button>
      <div slot="tip" class="el-upload__tip">只能上传jpg/png文件,且不超过10MB</div>
    </el-upload>
    <el-dialog :visible.sync="dialogVisible">
      <img width="100%" :src="fileList[0].url" alt="">
    </el-dialog>
  </div>
</template>
<script>
   import {policy} from './policy'
   import { getUUID } from '@/utils'

  export default {
    name: 'singleUpload',
    props: {
      value: String
    },
    computed: {
      imageUrl() {
        return this.value;
      },
      imageName() {
        if (this.value != null && this.value !== '') {
          return this.value.substr(this.value.lastIndexOf("/") + 1);
        } else {
          return null;
        }
      },
      fileList() {
        return [{
          name: this.imageName,
          url: this.imageUrl
        }]
      },
      showFileList: {
        get: function () {
          return this.value !== null && this.value !== ''&& this.value!==undefined;
        },
        set: function (newValue) {
        }
      }
    },
    data() {
      return {
        dataObj: {
          policy: '',
          signature: '',
          key: '',
          ossaccessKeyId: '',
          dir: '',
          host: '',
          // callback:'',
        },
        dialogVisible: false
      };
    },
    methods: {
      emitInput(val) {
        this.$emit('input', val)
      },
      handleRemove(file, fileList) {
        this.emitInput('');
      },
      handlePreview(file) {
        this.dialogVisible = true;
      },
      beforeUpload(file) {
        let _self = this;
        return new Promise((resolve, reject) => {
          policy(_self).then(response => {
            _self.dataObj.policy = response.data.policy;
            _self.dataObj.signature = response.data.signature;
            _self.dataObj.ossaccessKeyId = response.data.accessid;
            _self.dataObj.key = response.data.dir + getUUID()+'_${filename}';
            _self.dataObj.dir = response.data.dir;
            _self.dataObj.host = response.data.host;
            resolve(true)
          }).catch(err => {
            reject(false)
          })
        })
      },
      handleUploadSuccess(res, file) {
        console.log("上传成功...")
        this.showFileList = true;
        this.fileList.pop();
        this.fileList.push({name: file.name, url: this.dataObj.host + '/' + this.dataObj.key.replace("${filename}",file.name) });
        this.emitInput(this.fileList[0].url);
      }
    }
  }
</script>
<style>

</style>请求策略的js方法
policy.js
js
export function policy(_self) {
   return  new Promise((resolve,reject)=>{

    _self.axios.get('http://localhost:8181/oss/policy',{}).then(({data})=>{
        resolve(data);
    });

    })
}工具类js 在 src 下 创建 utils 文件夹 在它里面创建 index.js ,创建一个 封装了一些工具方法的js
java
import Vue from 'vue'
import router from '@/router'
import store from '@/store'

/**
 * 获取uuid
 */
export function getUUID () {
  return 'xxxxxxxx-xxxx-4xxx-yxxx-xxxxxxxxxxxx'.replace(/[xy]/g, c => {
    return (c === 'x' ? (Math.random() * 16 | 0) : ('r&0x3' | '0x8')).toString(16)
  })
}

/**
 * 是否有权限
 * @param {*} key
 */
export function isAuth (key) {
  return JSON.parse(sessionStorage.getItem('permissions') || '[]').indexOf(key) !== -1 || false
}

/**
 * 树形数据转换
 * @param {*} data
 * @param {*} id
 * @param {*} pid
 */
export function treeDataTranslate (data, id = 'id', pid = 'parentId') {
  var res = []
  var temp = {}
  for (var i = 0; i < data.length; i++) {
    temp[data[i][id]] = data[i]
  }
  for (var k = 0; k < data.length; k++) {
    if (temp[data[k][pid]] && data[k][id] !== data[k][pid]) {
      if (!temp[data[k][pid]]['children']) {
        temp[data[k][pid]]['children'] = []
      }
      if (!temp[data[k][pid]]['_level']) {
        temp[data[k][pid]]['_level'] = 1
      }
      data[k]['_level'] = temp[data[k][pid]]._level + 1
      temp[data[k][pid]]['children'].push(data[k])
    } else {
      res.push(data[k])
    }
  }
  return res
}

/**
 * 清除登录信息
 */
export function clearLoginInfo () {
  Vue.cookie.delete('token')
  store.commit('resetStore')
  router.options.isAddDynamicMenuRoutes = false
}表单页面上 调用 上传组件
java
//导入组件
import singleUpload from '@/components/upload/singleUpload.vue';
//注册组件
 components: { singleUpload },
//调用组件
<single-upload v-model="dataForm.pic"></single-upload>在列表上展示图片
shell
  <el-table-column prop="pic" label="照片">
        <template slot-scope="scope">
          <img :src="scope.row.pic" alt="" style="width: 100px; height: 100px" />
        </template>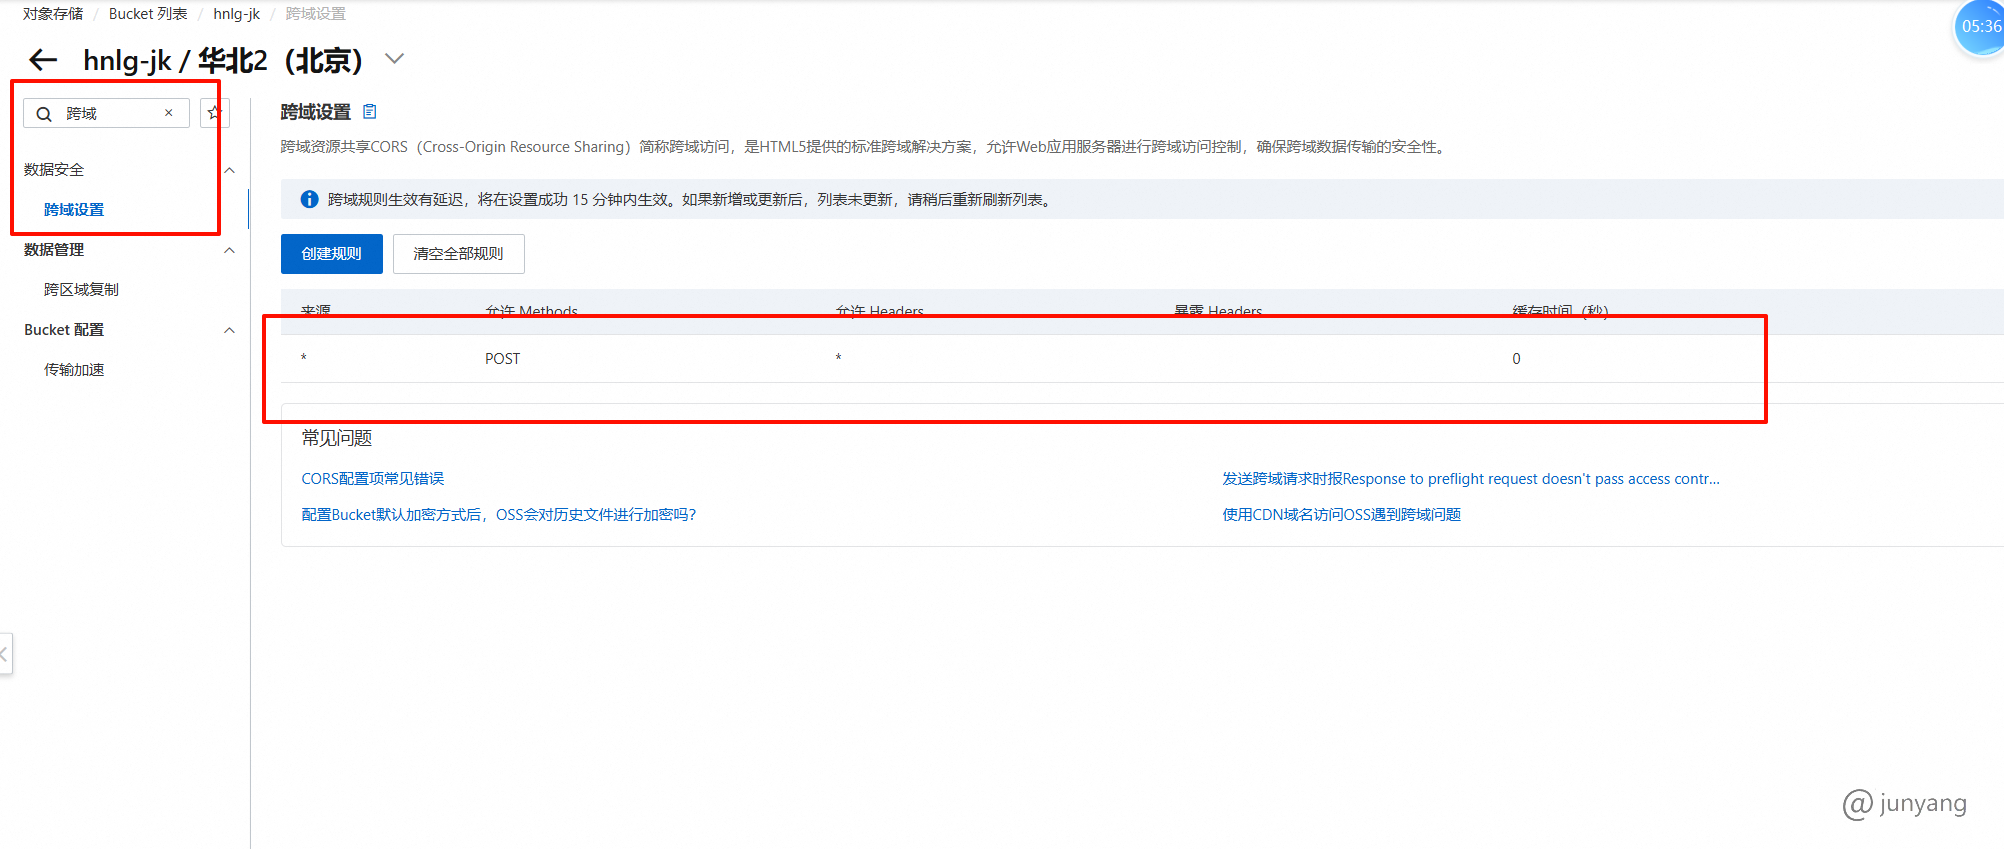
</el-table-column>最后 所有的配置 貌似都调整正确了,此时 上传还是失败,控制报错信息 跨域问题, 所以 咱们要把 bucket 的 基础设置中的 跨域给打开